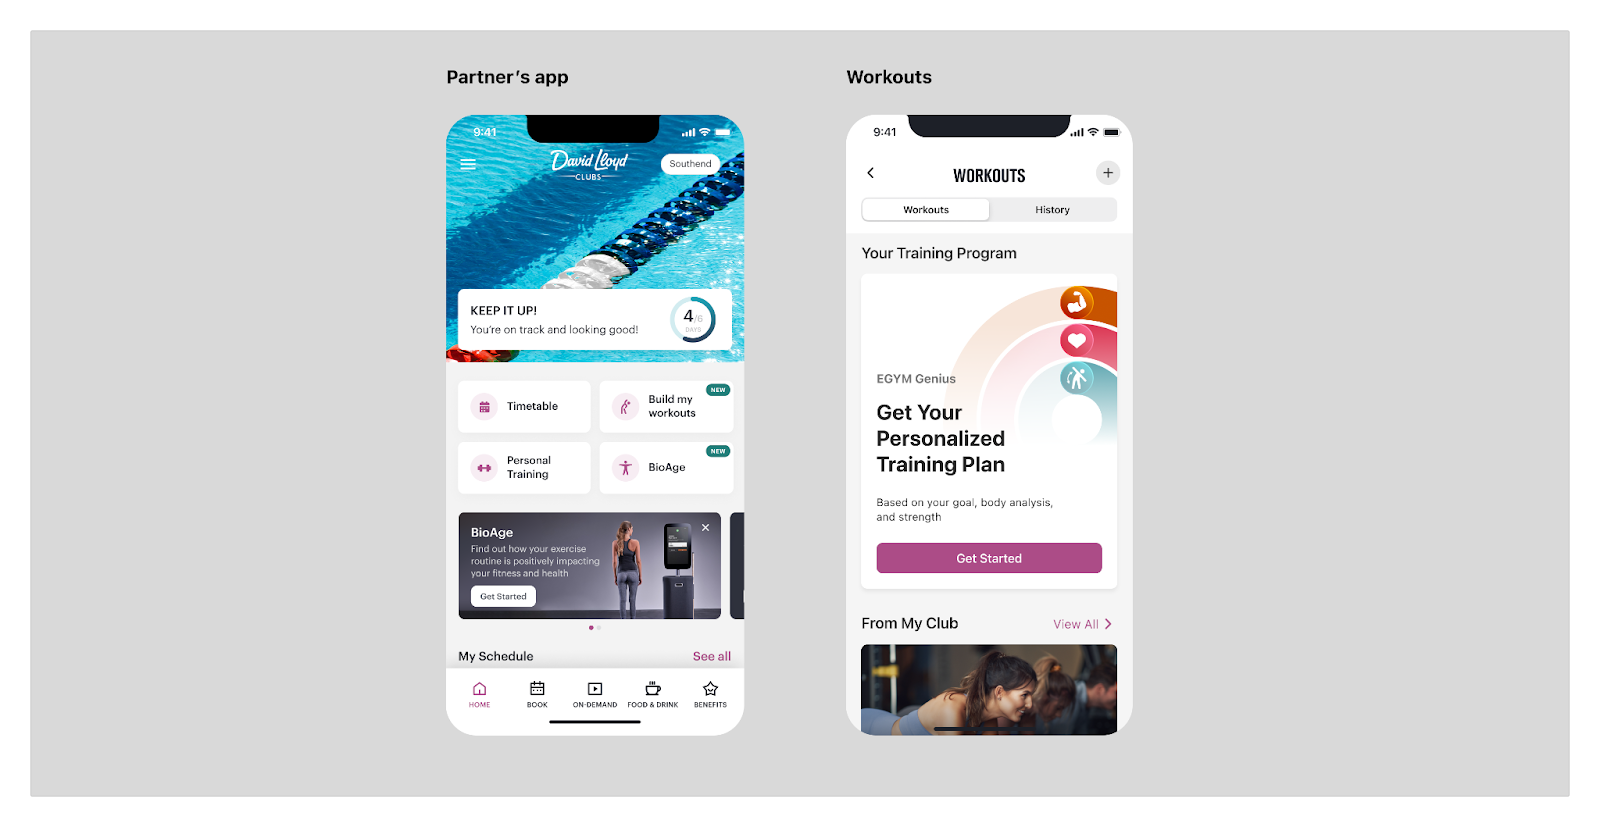
The EGYM training experience is delivered to partner apps as a Micro Web Application (MWA) that partners can integrate into their mobile apps. This approach provides partner app users with a cohesive experience while giving partners a framework for quick and seamless integration.
The EGYM Micro Web Application should integrate seamlessly with the partner mobile application so that users perceive it as a native part of the partner app.
The purpose of this document is to provide high-level technical guidance on the steps a partner needs to take to integrate the EGYM MWA.
Step 1. Set up MWA infrastructure in the partner app (can be done autonomously by the partner):
- Review the documentation in the Ionic Portals section.
- Enable Ionic Portals and Live Updates in your mobile app.
- In addition to Live Updates, integrate ionic-cloud CLI into your native app build CI pipeline. This ensures the MWA is available on the device without relying on Live Updates and helps reduce live update counts. Use the following command (see the table below for parameter values):
- Install Appflow CLI
appflow live-update download --token <token> --app-id <appId> --channel-name <channel> --zip-name <appId>-<channel>.zip
- Add the Capacitor plugins listed here.
Step 2. Integrate partner and EGYM products (requires collaboration with EGYM to understand current and future product use cases):
This step varies from partner to partner. Treat this section as a starting point for collaborative discussion rather than a prescriptive implementation guide.
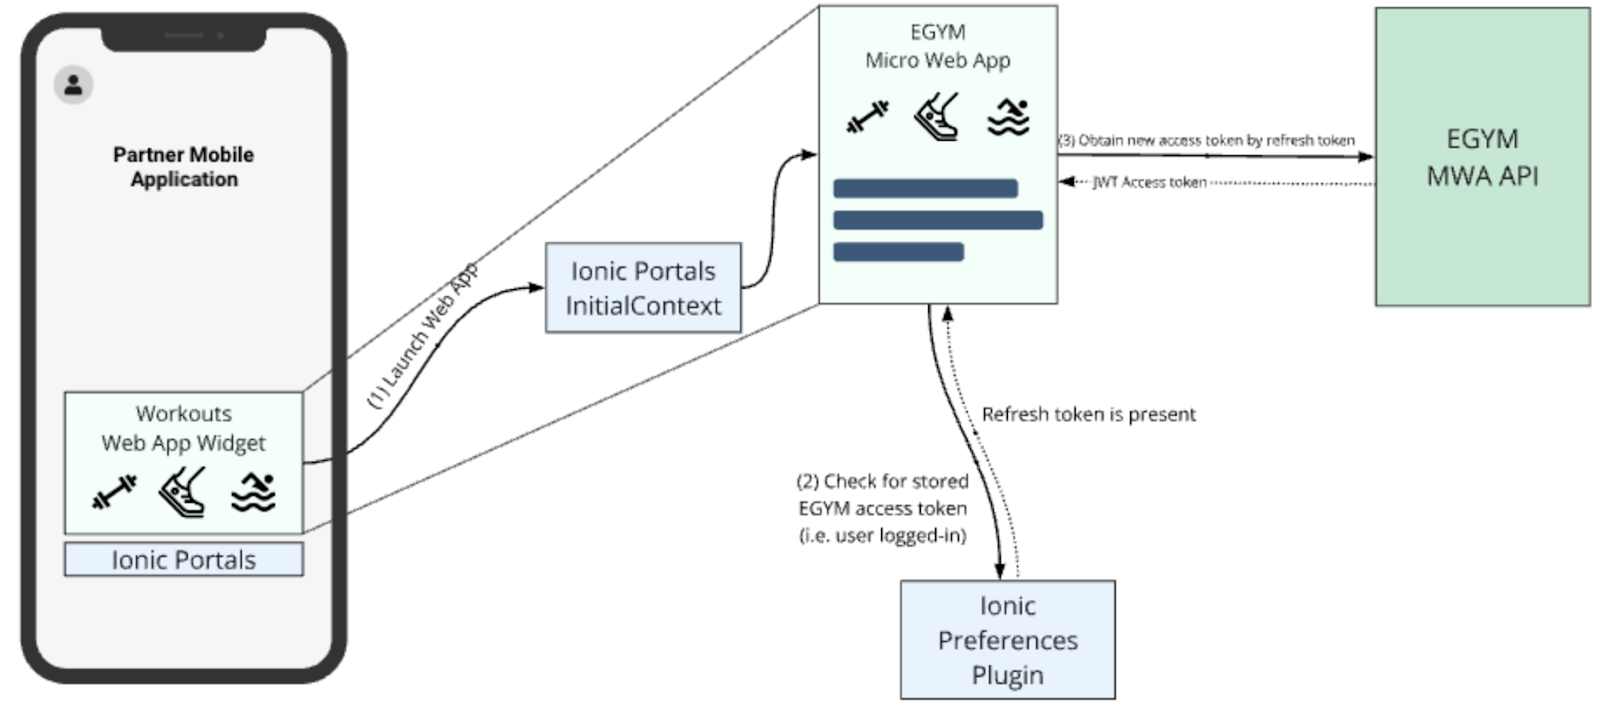
- Set up communication between the mobile app and MWA:
- Pass required parameters to MWA through
initialContext. - Implement the Ionic Portals
dismissevent to allow MWA to return from full screen to the native partner app, as described here.
- Pass required parameters to MWA through
- Provide a list of locations to map to EGYM locations.
- Micro Web App Partner Documentation: https://developer.egym.com/mwa/docs/introduction
- Ionic Portals Documentation: https://ionic.io/docs/portals/
The sections below provide a quick-start overview for each platform. For complete details, refer to the official Ionic Portals documentation linked in each section.
iOS
Official documentation:
Add the Ionic Portals dependency via Swift Package Manager or CocoaPods. See the iOS Quick Start for detailed installation instructions.
Register as early as possible in the app lifecycle -- typically in AppDelegate or the SwiftUI App initializer:
// UIKit
func application(
    _ application: UIApplication,
    didFinishLaunchingWithOptions launchOptions: [UIApplication.LaunchOptionsKey: Any]?
) -> Bool {
    PortalsRegistrationManager.shared.register(key: "YOUR_PORTALS_KEY")
    return true
}
// SwiftUI
import IonicPortals
@main
struct PartnerApp: App {
init() {
PortalsRegistrationManager.shared.register(key: "YOUR_PORTALS_KEY")
}
var body: some Scene {
WindowGroup { ContentView() }
}
}Avoid committing your Portals key to source code repositories. Use an
.xcconfigfile to keep it out of version control.
Define a Portal with a LiveUpdate configuration pointing to the correct Appflow app ID and channel:
extension Portal {
    static let workouts = Portal(
        name: "workouts",
        startDir: "portals/workouts",
        liveUpdateConfig: .workoutsMwa
    )
}

extension LiveUpdate {
    static let workoutsMwa = Self(
        appId: "851e0894",
        channel: "${partnerName}production",
        syncOnAdd: true
    )
}
When syncOnAdd is true, a sync check occurs the first time the Portal is created. Updated assets are downloaded and applied on the next Portal load.
Use PortalView (SwiftUI) or PortalUIView (UIKit):
// SwiftUI
struct WorkoutsView: View {
    var body: some View {
        PortalView(portal: .workouts)
    }
}
// UIKit
class WorkoutsViewController: UIViewController {
override func loadView() {
self.view = PortalUIView(portal: .workouts)
}
}Copy the MWA web bundle into your Xcode project so it is included in Bundle.main. The directory name must match the Portal's startDir. You can automate this with a build phase script or the Appflow CLI.
Android
Official documentation:
Add the dependencies to your module-level build.gradle:
dependencies {
    implementation 'io.ionic:portals:0.12.0'
    implementation 'io.ionic:liveupdates:0.5.7'
}
Ensure mavenCentral() is included in your project-level repositories.
Create a custom Application class and register before any Portals are loaded:
class MyApplication : Application() {
    override fun onCreate() {
        super.onCreate()
        PortalManager.register("YOUR_PORTALS_KEY")
    }
}
Add it to your AndroidManifest.xml:
<application android:name=".MyApplication" ... >Avoid committing your Portals key to source code repositories. Use the Secrets Gradle Plugin to keep it out of version control.
PortalManager.newPortal("workouts")
    .setStartDir("851e0894-${partnerName}production")
    .setLiveUpdateConfig(
        applicationContext,
        LiveUpdate("851e0894", "${partnerName}production")
    )
.create()Option A -- XML layout:
<io.ionic.portals.PortalView
    app:portalId="workouts"
    android:layout_width="match_parent"
    android:layout_height="match_parent" />
Option B -- Jetpack Compose:
@Composable
fun WorkoutsPortal() {
    AndroidView(factory = { PortalView(it, "workouts") })
}
Activities containing a Portal should add the following to
AndroidManifest.xmlto prevent WebView restarts on configuration changes:android:configChanges="orientation|keyboardHidden|keyboard|screenSize|locale|smallestScreenSize|screenLayout|uiMode"
Web assets can contain directories starting with special characters (e.g., underscores) that Android's default asset packaging omits. Add the following to defaultConfig in your module build.gradle:
aaptOptions {
    // Override default to accommodate modern web app directory structures
    ignoreAssetsPattern '!.svn:!.git:!.ds_store:!*.scc:.*:!CVS:!thumbs.db:!picasa.ini:!*~'
}Instead of relying solely on Live Updates at runtime, you can bundle the MWA into your APK at build time. This ensures the app works on first launch without waiting for a Live Update download and reduces your live update count.
Add the following tasks to your module-level build.gradle. This uses the Appflow CLI to download the latest MWA build and unpack it into src/main/assets/ before each build.
See the full reference implementation at egym/android-mwa-reference.
// --- MWA download configuration ---
def appId = "851e0894"                  // MWA App Id (see configuration table)
def channel = "${partnerName}production" // Live Update channel
def ionicToken = ""                     // Appflow Personal Access Token

def zipName = "${appId}-${channel}.zip"
def zipFile = file("${project.projectDir}/${zipName}")
def destinationDir = file("src/main/assets/${appId}-${channel}")

tasks.register("cleanMwaAssets", Delete) {
    group = "appflow"
    description = "Clean previous Live Update assets and zip"
    delete destinationDir, zipFile
}

tasks.register("downloadMwaBuild", Exec) {
    group = "appflow"
    description = "Download Live Update zip from Appflow"
    dependsOn "cleanMwaAssets"
    workingDir project.projectDir

    doFirst {
        println "Downloading Live Update: appId=${appId}, channel=${channel}"
    }

    commandLine "bash", "-lc",
            "appflow live-update download " +
                    "--app-id=${appId} " +
                    "--channel-name=${channel} " +
                    "--token=${ionicToken} " +
                    "--zip-name=${zipName}"

    outputs.file(zipFile)
}

tasks.register("unzipMwaBuild", Copy) {
    group = "appflow"
    description = "Unzip Live Update into src/main/assets"
    dependsOn "downloadMwaBuild"

    from { zipTree(zipFile) }
    into destinationDir

    doFirst {
        destinationDir.mkdirs()
    }

    inputs.file(zipFile)
    outputs.dir(destinationDir)
}

tasks.register("cleanupMwaZip", Delete) {
    group = "appflow"
    description = "Remove downloaded zip after extraction"
    dependsOn "unzipMwaBuild"
    delete zipFile
}

// Hook into the build lifecycle so MWA is downloaded before each build
tasks.matching { it.name == "preBuild" }.all {
    dependsOn "cleanupMwaZip"
}
This task chain runs automatically before each build: it cleans any previously downloaded assets, downloads the latest MWA zip from Appflow, extracts it into the assets directory, and removes the zip file.
React Native
Official documentation:
npm install @ionic/portals-react-nativeimport { register } from '@ionic/portals-react-native';
await register('YOUR_PORTALS_KEY');import { PortalView } from '@ionic/portals-react-native';
const workoutsPortal = {
name: 'workouts',
startDir: 'portals/workouts',
initialContext: {
// Pass initial context properties here
},
};
<PortalView
portal={workoutsPortal}
style={{ flex: 1 }}
/>;Capacitor plugins must be explicitly registered with both their Android class path and iOS class name:
const workoutsPortal = {
    name: 'workouts',
    startDir: 'portals/workouts',
    plugins: [
        {
            androidClassPath: 'com.capacitorjs.plugins.preferences.PreferencesPlugin',
            iosClassName: 'CAPPreferencesPlugin',
        },
        // Add other required plugins here
    ],
};AppDelegate rename: Both Capacitor and React Native define an AppDelegate class. Rename yours to avoid conflicts:
// AppDelegate.h
@interface RNAppDelegate : UIResponder <UIApplicationDelegate, RCTBridgeDelegate>
// main.m
return UIApplicationMain(argc, argv, nil, NSStringFromClass([RNAppDelegate class]));Podfile: Add a pre_install hook to compile Capacitor as a dynamic framework:
dynamic_frameworks = ['Capacitor', 'CapacitorCordova']

pre_install do |installer|
    installer.pod_targets.each do |pod|
        if dynamic_frameworks.include?(pod.name)
            def pod.static_framework?; false; end
            def pod.build_type; Pod::BuildType.dynamic_framework; end
        end
    end
endThere is currently no built-in tooling for bundling web apps as part of @ionic/portals-react-native. Follow the native guides for iOS and Android to manage web asset bundling as part of the native build process for each platform, or use the Appflow CLI.
The partner native mobile app and the Workouts MWA must use the same major versions of Ionic Portals, Capacitor Runtime, and Capacitor Core Plugins. Use the following versions:
- Ionic Portals: latest (v0.12.*)
- Capacitor Core: latest (v7.*)
- Capacitor Plugins: latest (v7.*)
| Property Name | Value |
|---|---|
| Workouts MWA App Id | 851e0894 (startingRoute - /workouts/home) |
| Bioage MWA App Id | 068a3720 (startingRoute - /bioage/home) |
| NFC MWA App Id | dcbe378a (startingRoute - /nfc/home) |
| Live Update Channels | ${partnerName}develop, ${partnerName}preprod, ${partnerName}production |
| Personal Access Token (needed for Ionic CLI) | Ask EGYM: Keeper -> BMA -> <Ionic Personal Access Token> |
| Ionic Portals Key | Ask EGYM: Keeper -> BMA -> <Ionic Portals Key> |
| Name | Description |
|---|---|
| @capacitor/preferences | Provides access to mobile phone storage for preserving account linking state and EGYM API access tokens. This core plugin (https://capacitorjs.com/docs/apis) must be enabled in both the mobile application and the web application. |
| @capacitor/app | Standard plugin required for better user experience. |
| @capacitor/haptics | Standard plugin required for better user experience. |
| @capacitor/keyboard | Standard plugin required for better user experience. |
| @capacitor/status-bar | Standard plugin required for better user experience. |
| @capacitor/browser | Opens external links natively in an in-app browser (e.g., terms-of-use and privacy-policy pages hosted on external resources). |
| @capacitor/device | Exposes internal device information such as model, operating system version, and unique device identifiers. |
| @capacitor-community/sqlite | Plugin for working with on-device SQLite databases. Requires the SQLCipher package. |
iOS:
SQLCipherAndroid:
net.zetetic:android-database-sqlcipher
androidx.sqlite:sqlite
androidx.security:security-cryptoThere are two options for integrating the partner native app with the EGYM MWA:
- 2.1 (Preferred): Link the partner app with EGYM ID using
membershipId. - 2.2: Link the partner app with EGYM ID using
email.
Prerequisites:
- Integration with the partner's membership management system is required to link app profiles with EGYM ID (the user's account in the EGYM system). See https://developer.egym.com/mms-api-v2/apis/mms-v2.
- An EGYM ID (
accountId) must be created using MMS API v2 before the member opens MWA. - The
membershipIdmust be unique within the partner's system. - The member must complete EGYM ID registration by opening the EGYM MWA and accepting the EGYM ID terms of use.
An EGYM ID is required to access the EGYM MWA and EGYM machines. A critical part of the integration is linking user accounts from the partner mobile application (typically from the membership management system) with EGYM and persisting this link between application launches, so the user completes the linking flow only once.
The partner app shares user data with MWA to link an EGYM ID, including email, firstName, lastName, dateOfBirth, gymLocation, language, measurementSystem, gender, and a unique membershipId from the partner's system. See Properties that mobile app needs to pass to MWA Initial Context.
The membershipId maintains the link between the partner system and EGYM.
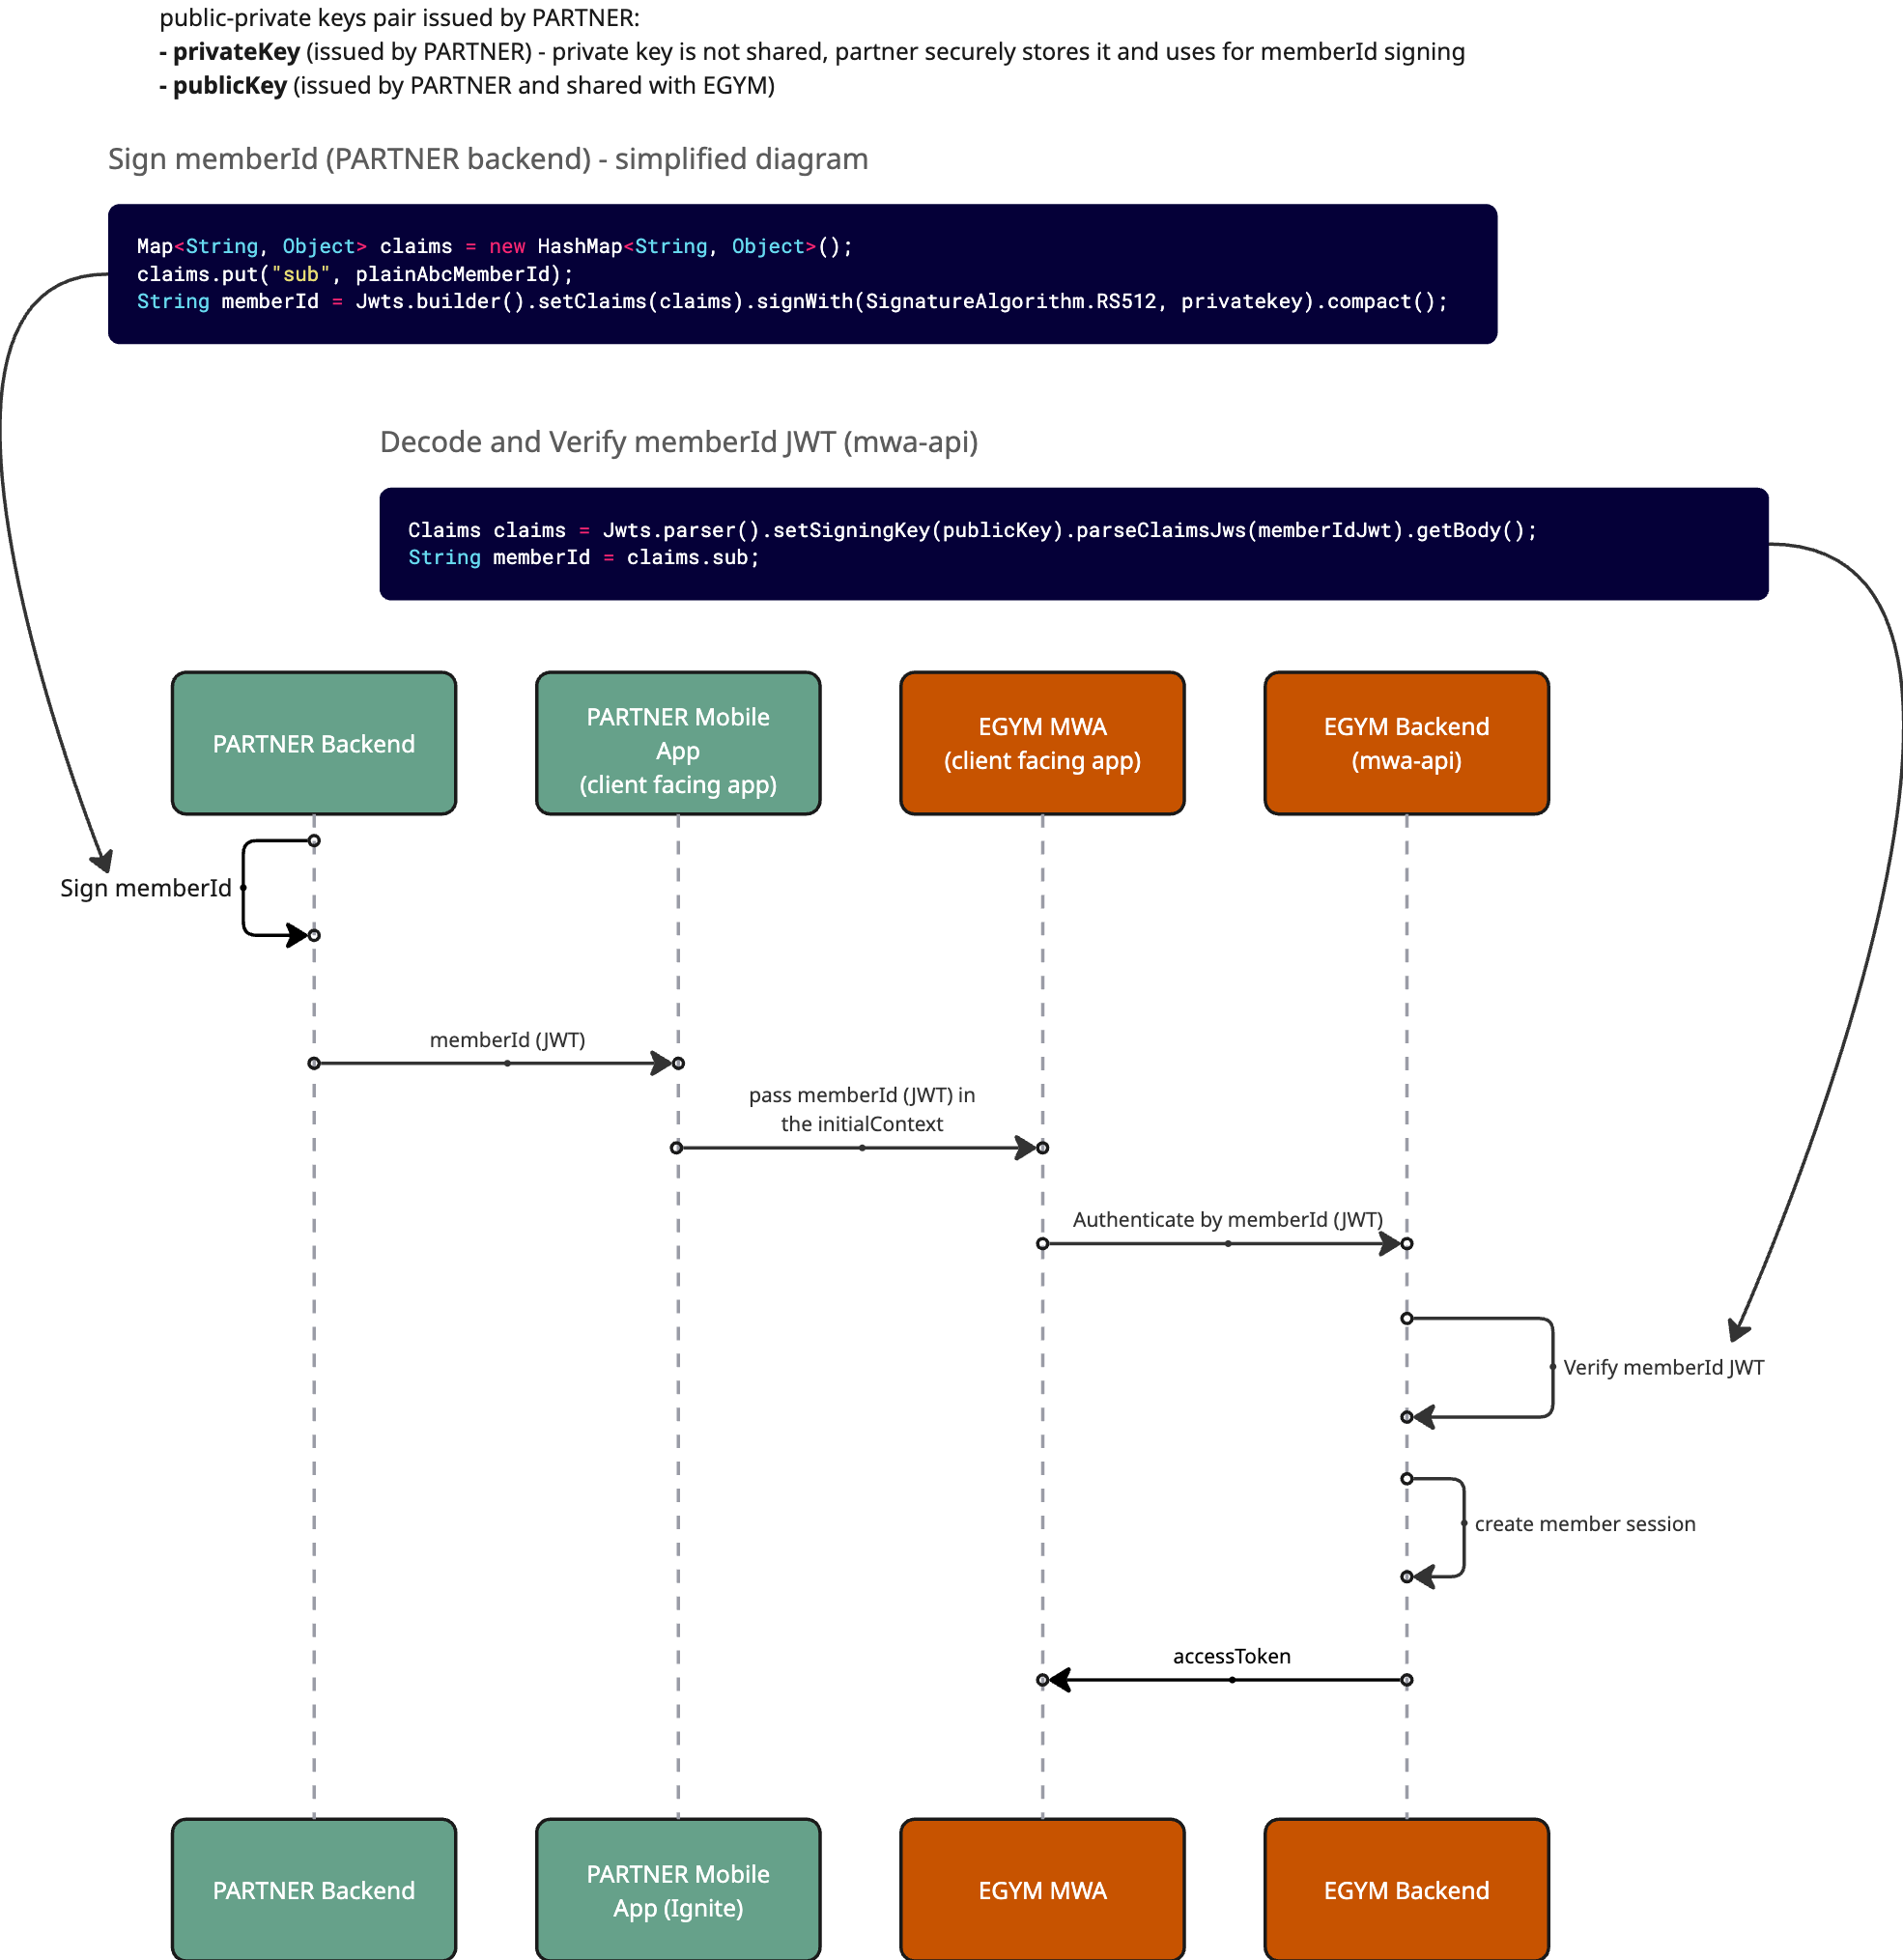
To ensure a secure connection between EGYM and the partner system, the membershipId must be signed on the partner side and securely included in the initialContext:
Generate a key pair. The partner generates a public/private key pair and shares the public key with EGYM via a secure channel. EGYM stores the public key in a secret manager and uses it to decode and verify the
membershipId.Example -- generate JWT keys:
- Private Key Generation:
openssl genrsa -out ./private.key 4096- This generates a
private.keyfile containing your private key.
Do not share this file. Keep it secret. If someone obtains this private key, they can impersonate your system.
- Public Key Generation:
openssl rsa -in private.key -pubout -outform PEM -out public.key- This creates a
public.keyfile from your private key. Share this file with EGYM; it will be used to verify JWTs signed by your private key.
- Private Key Generation:
Create a signing endpoint. The partner implements (or extends an existing) backend endpoint that generates a short-lived JWT signed with the private key containing the
membershipId.Expected JWT payload:
sub: the member ID in the partner's member management systemexp: token expiration timestamp
Pass the JWT at launch. When the user opens the EGYM entry point within the partner app:
- The partner app requests a signed
membershipIdJWT from the partner backend. - The JWT is included in the
initialContextunder themembershipIdfield. - To optimize performance, the partner can cache tokens and reuse them until they expire, reducing backend calls.
- The partner app requests a signed
EGYM verifies the JWT. The EGYM MWA reads the
membershipIdJWT from the initial context and forwards it to the EGYM backend. The EGYM backend accepts the JWT via its passwordless authentication API and verifies the signature, ensuring the request originates from an authorized and trusted source.
When the user opens the MWA, the following cases are possible:
- User is notified about the creation of an EGYM ID.
- User accepts the terms of use and privacy policy.
- User accepts the health data processing consent.
- User can optionally accept sharing their data with the gym.
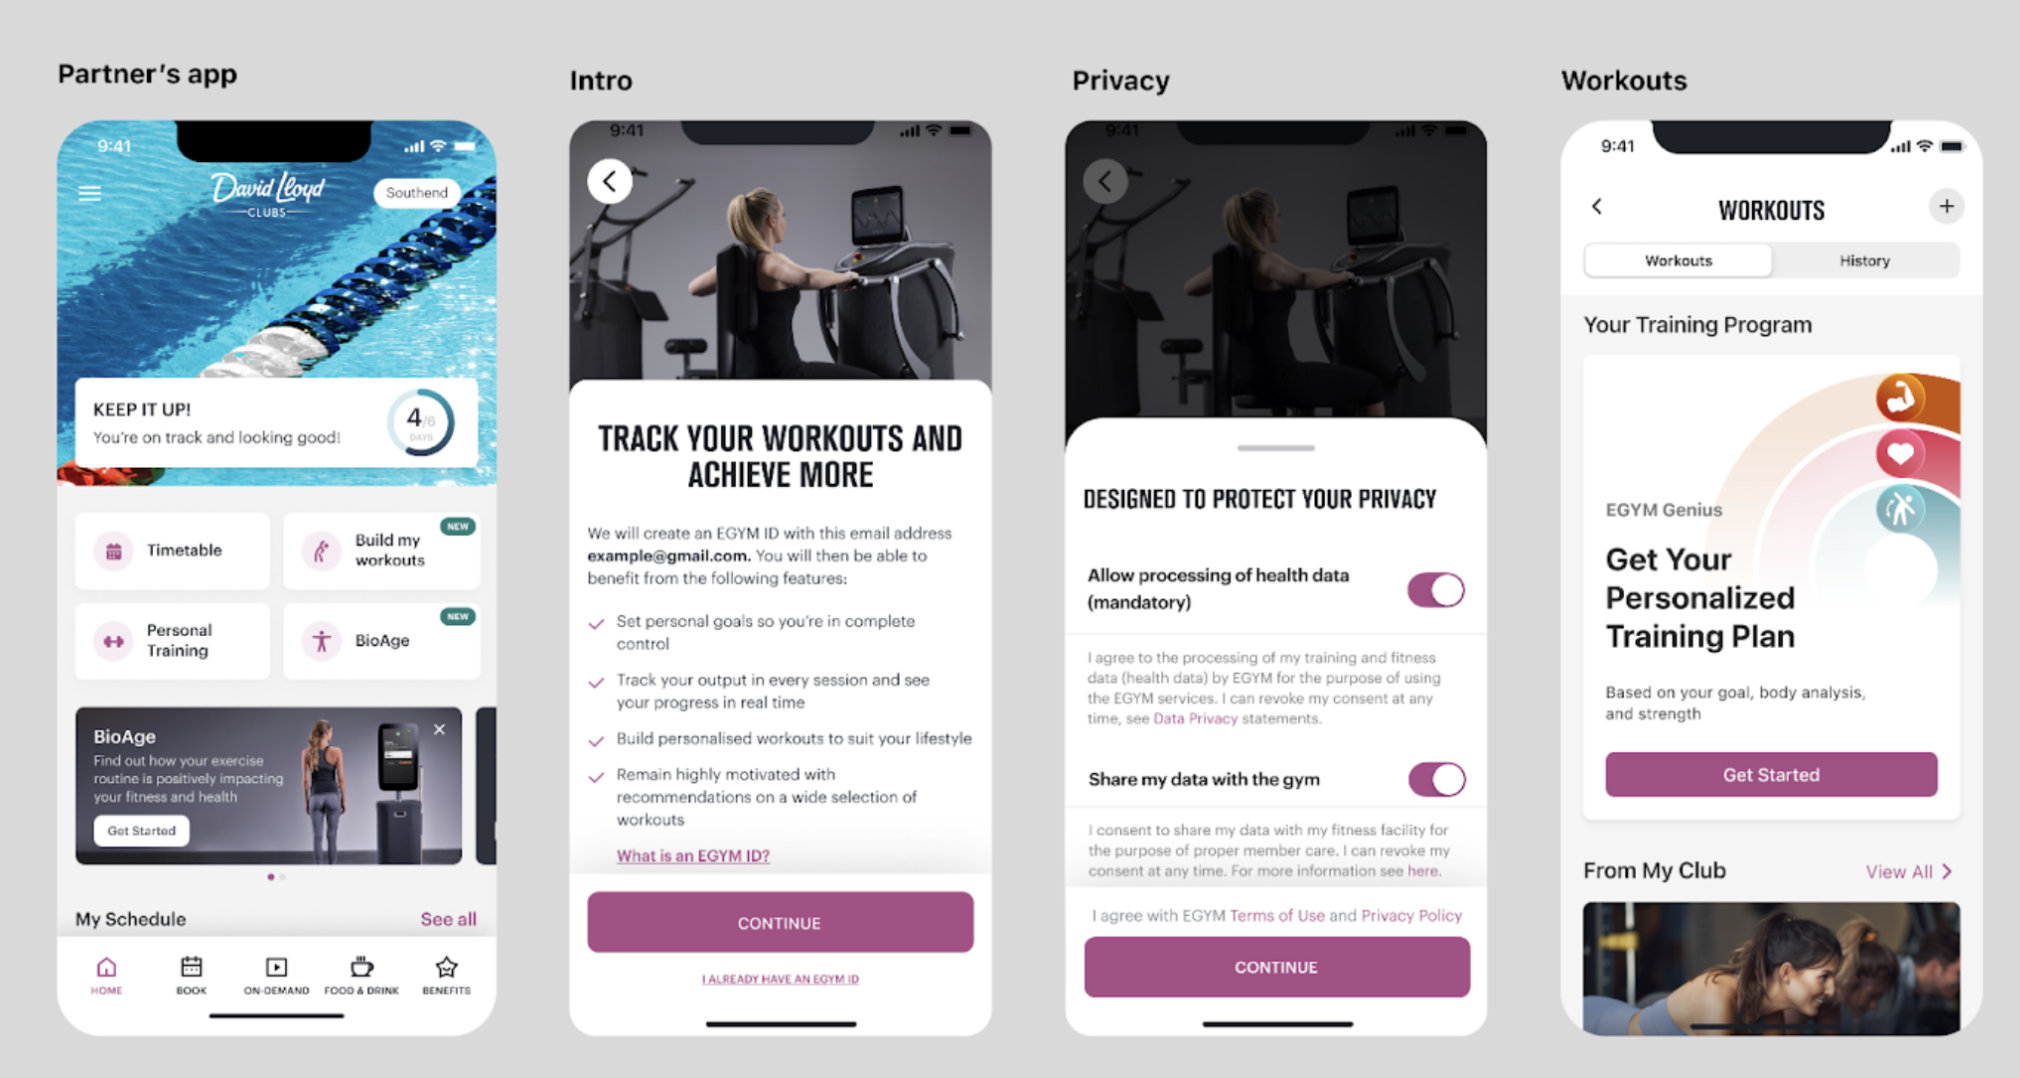
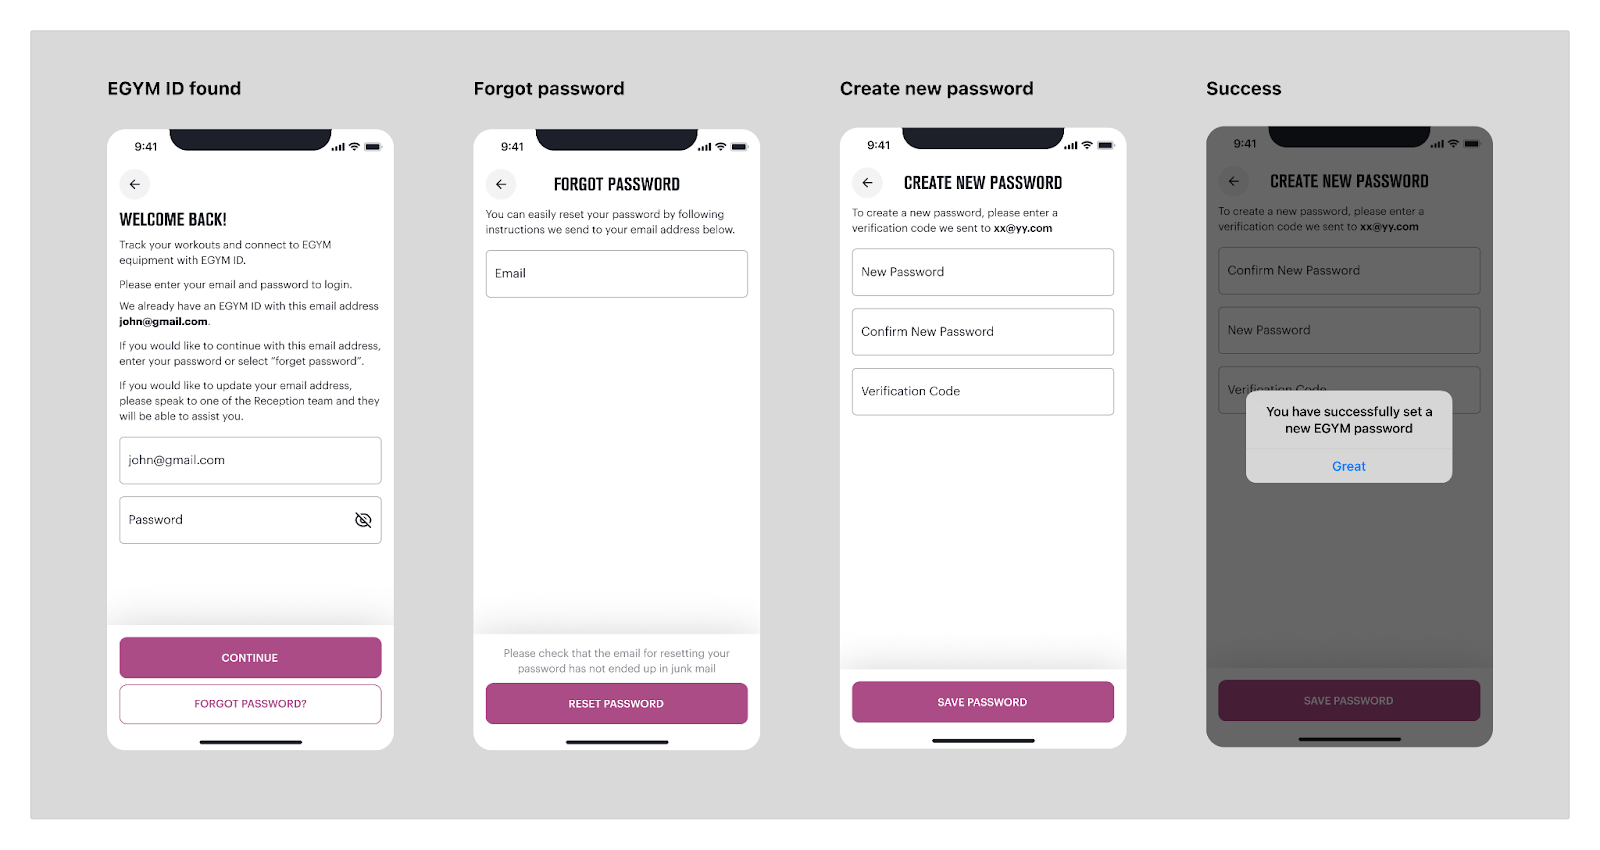
- User is prompted to enter their password.
Note: The
An EGYM ID is required to access the EGYM MWA and EGYM machines. A critical part of the integration is linking user accounts from the partner mobile application with EGYM and persisting this link between application launches, so the user completes the linking flow only once.
The partner app shares user data with MWA to create an EGYM user, including email, firstName, lastName, dateOfBirth, gymLocation, language, measurementSystem, and gender.
The most common scenario is when a partner app user does not yet have an EGYM ID. In this case, the MWA creates an EGYM ID and exerciser profile automatically and associates it with the partner account.
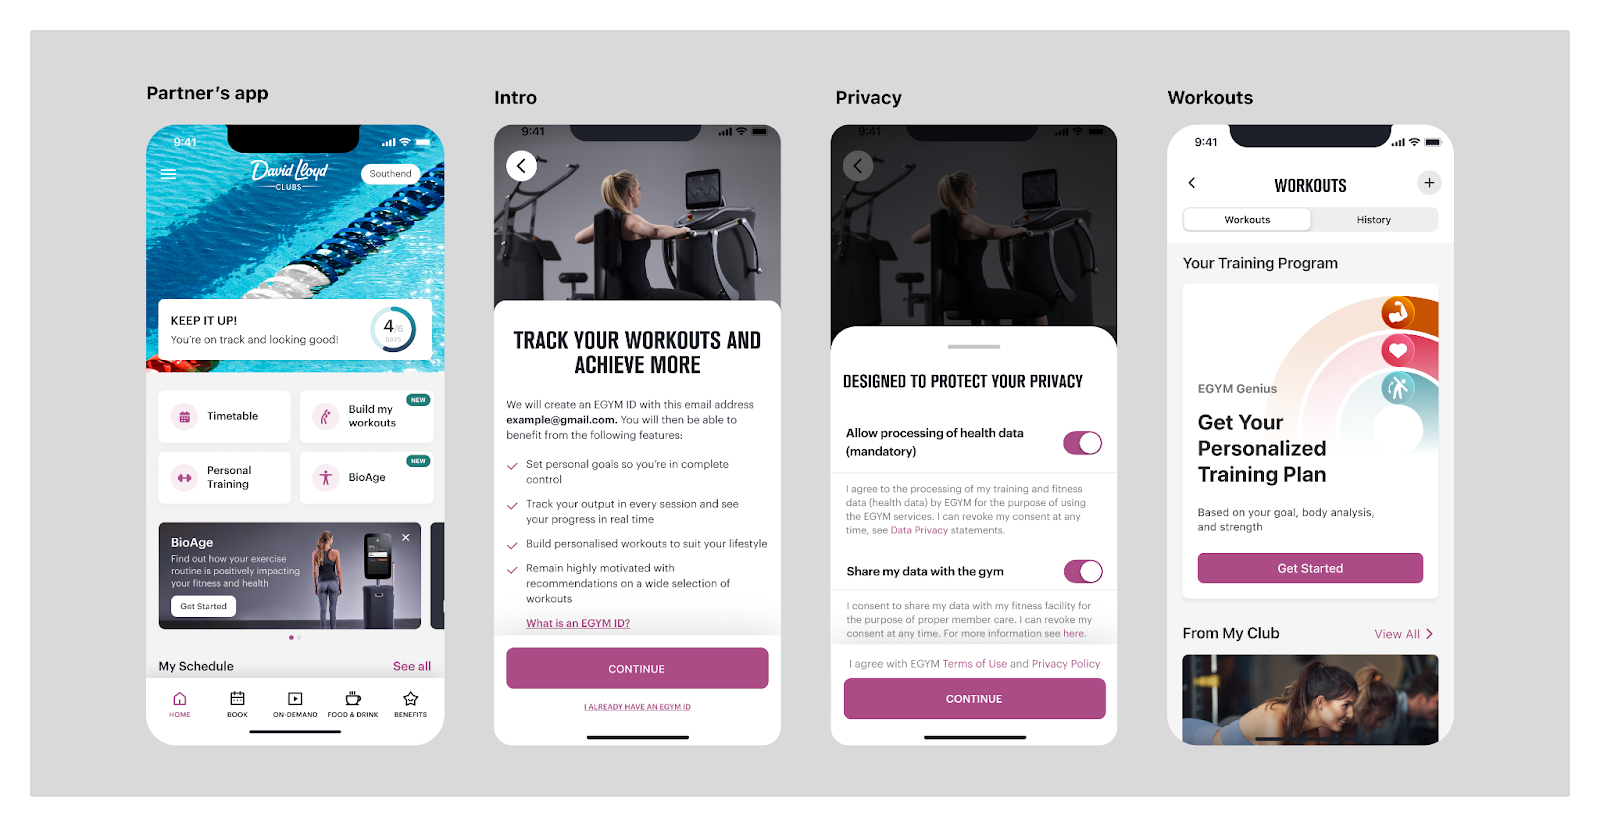
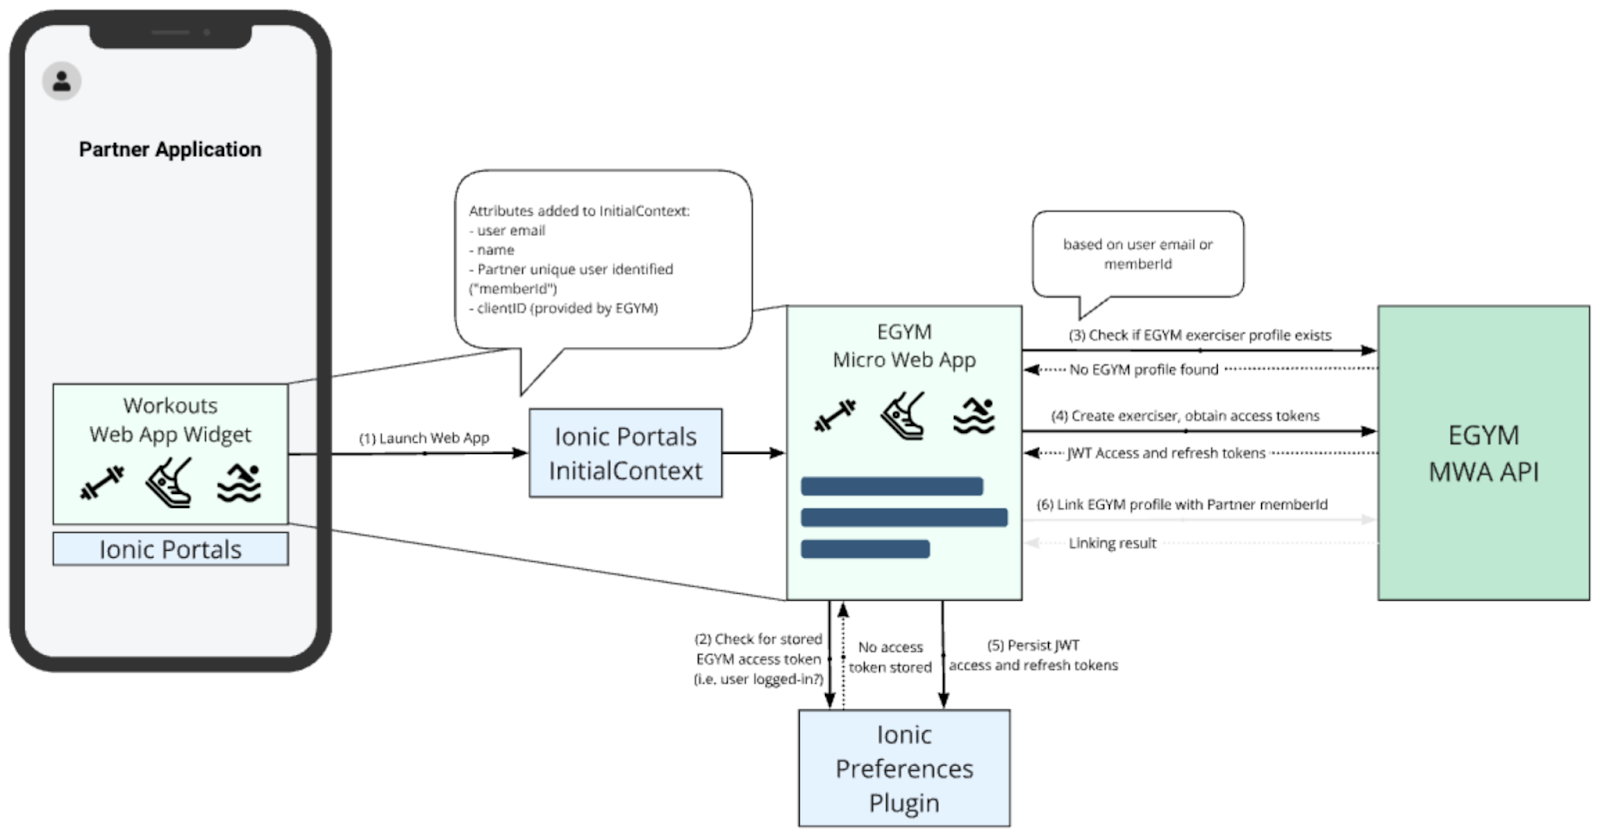
The partner application is responsible for passing a predefined set of attributes to the Workouts MWA through the Ionic InitialContext. See the Properties that mobile app needs to pass to MWA Initial Context section for the full list.
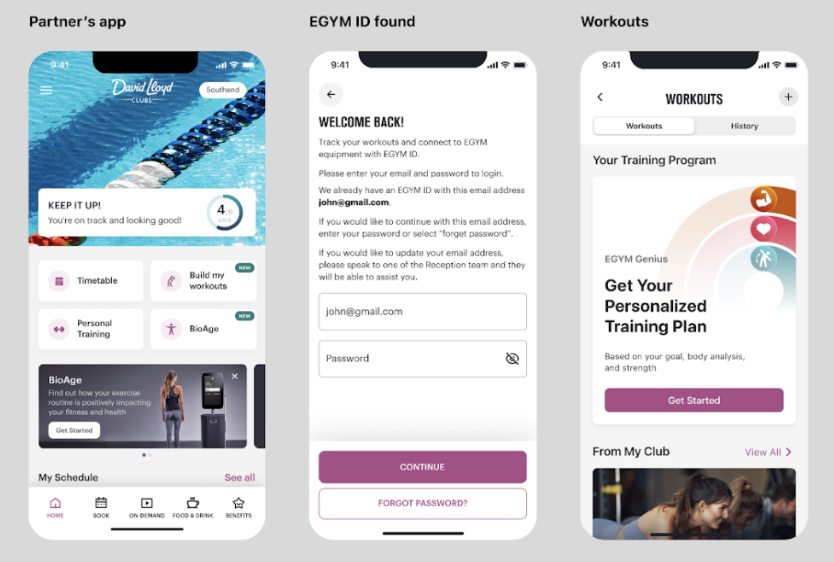
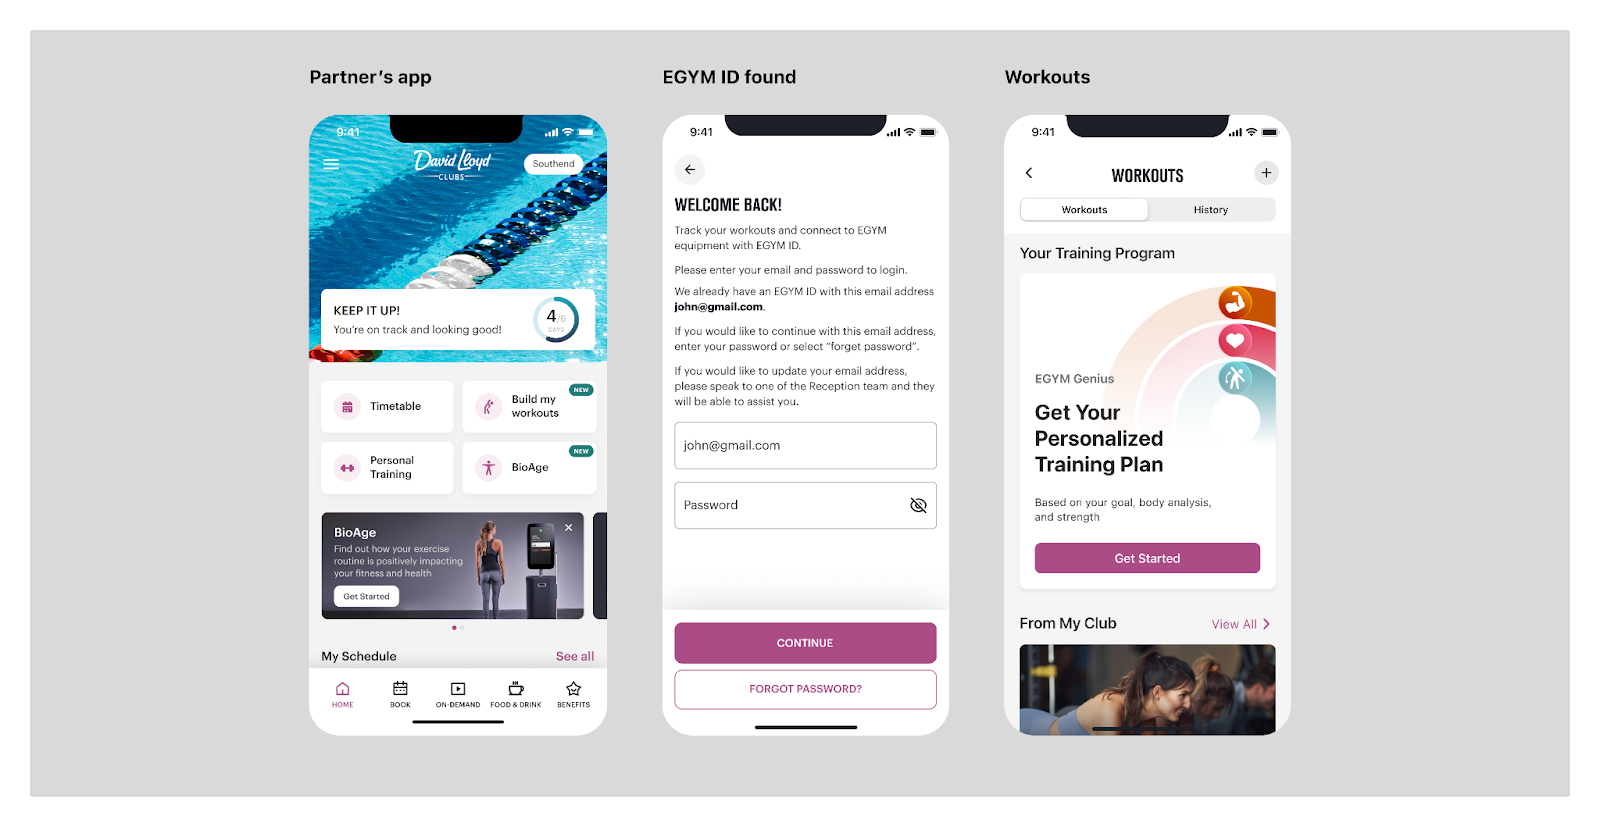
This scenario applies to users who already have an EGYM ID. The data structure passed through the Ionic InitialContext is the same as for Use Case 2.2.1. The MWA checks whether the user exists; if the email is found in the EGYM platform, the user is asked to enter their credentials. After authentication, the MWA triggers account linking and associates the EGYM ID with the partner account.
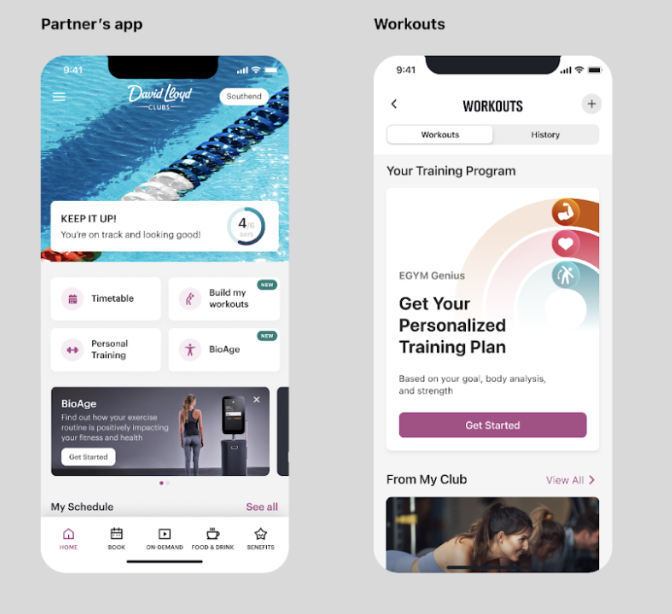
This scenario applies when the user has already linked accounts and opens the app to track workouts. The MWA identifies this flow by the presence of both a refresh token and an access token in user preferences. To simplify the partner-side integration, the data structure passed through the Ionic InitialContext can be the same as for Use Case 2.2.1.
| Property Name | Type | Required in membershipId-based linking | Required in email-based linking | Description |
|---|---|---|---|---|
| String | Yes | Yes | Email of the partner app user | |
| firstName | String | No | Yes | First name of the partner app user |
| lastName | String | No | Yes | Last name of the partner app user |
| dateOfBirth | String | No | Yes | Date of birth of the user; used by the BioAge feature |
| gymLocation | String | Yes | Yes | Identifier of the partner user's gym location (from the partner system; mapped to an EGYM location during setup). Required for MWA to resolve training plan and exercise customizations. |
| language | String | Yes | Yes | User locale and language code (e.g., "en_US"). Required for localizing the web app interface and workout-related data. |
| measurementSystem | String | Yes | Yes | Measurement unit system. Accepted values: "IMPERIAL" or "METRIC". Required for the workouts feature. |
| gender | String | No | Yes | Gender of the user ("MALE" or "FEMALE") |
| membershipId | String | Yes | No | Member ID in the partner system. Must be unique for exactly one member in the gym chain. |
| cardNumber | String | No | Yes | A 12-digit number (may have leading zeroes) that corresponds to the NFC pass content. Required for NFC Login. |
| startingRoute | String | Yes | Yes | Route to open after the web application launches. Provided by EGYM. |
| clientId | String | Yes | Yes | Hardcoded application identifier. Provided by EGYM. |
An important part of the integration between the partner and EGYM is configuring mappings between gym location identifiers in both systems. The EGYM backend uses gym location identifiers in user account linking flows (registration and login) as well as the workouts feature, so setting up location mappings is a prerequisite for the web app to function properly.