EGYM provides a sample web application that might be used as a reference: https://github.com/egym/mwa-reference
The purpose of the app is to give an example of how a micro web application can be structured and what mechanics are used to interact with native mobile features.
EGYM Recommends creating your own web app from scratch but fetching some ideas from the mwa-reference app.
First of all, go through the Ionic documenation and get familiar with basic concepts.
Further down we describe the creation process of an MWA from the EGYM point of view and in relation to the EGYM BMA app perspective.
Ionic CLI has a set of useful tools for developing Ionic apps.
Install it with the following command:
npm install -g @ionic/cli
In the mwa-reference app there is a @capacitor-community/http package. It is added there only for checking the backward compatibility when updating to @capacitor/core@^4.6. In your project you should remove this http plugin so it will not pollute your console with extra warnings.
Once Ionic CLI is installed, it is possible now to bootstrap a new Ionic MWA from scratch. Run:
ionic start
Follow the command line prompts to finish the installation:
- Select "React" framework
- Type the name of the app
- Select a starter template. We recommend choosing a blank app so there are no redundant files that are usually forgotten to remove from the project.
We highly recommend to setup eslint and prettier for every web project. It helps maintain consistency in the code style and avoid general errors and therefore eliminate bugs.
Here is how the eslint & prettier configuration looks like in EGYM for MWA:
- Install the following packages:
npm install --save-dev @typescript-eslint/eslint-plugin @typescript-eslint/parser eslint-config-airbnb eslint-config-airbnb-typescript eslint-config-prettier eslint-plugin-import eslint-plugin-jest eslint-plugin-prettier eslint-plugin-react eslint-plugin-react-hooks husky prettier pretty-quickAdd .eslintrc.js and .eslintignore files
Add npm scripts in package.json
"lint": "eslint --ext js,jsx,ts,tsx src",
"lint-fix": "eslint --fix --ext js,jsx,ts,tsx src",- We also recommend to add the "clear npm cache" npm script, which sometimes can help with clearing eslint errors which are already resolved but still shown as errors:
"nuke:cache": "rm -rf ./node_modules/.cache"- Add prettier files. .prettierrc.json and .prettierignore
- Install pre-commit hooks. Add the .husky folder with pre-commit scripts & run
husky install. Pre-commit hook will run prettier checks on staged files.
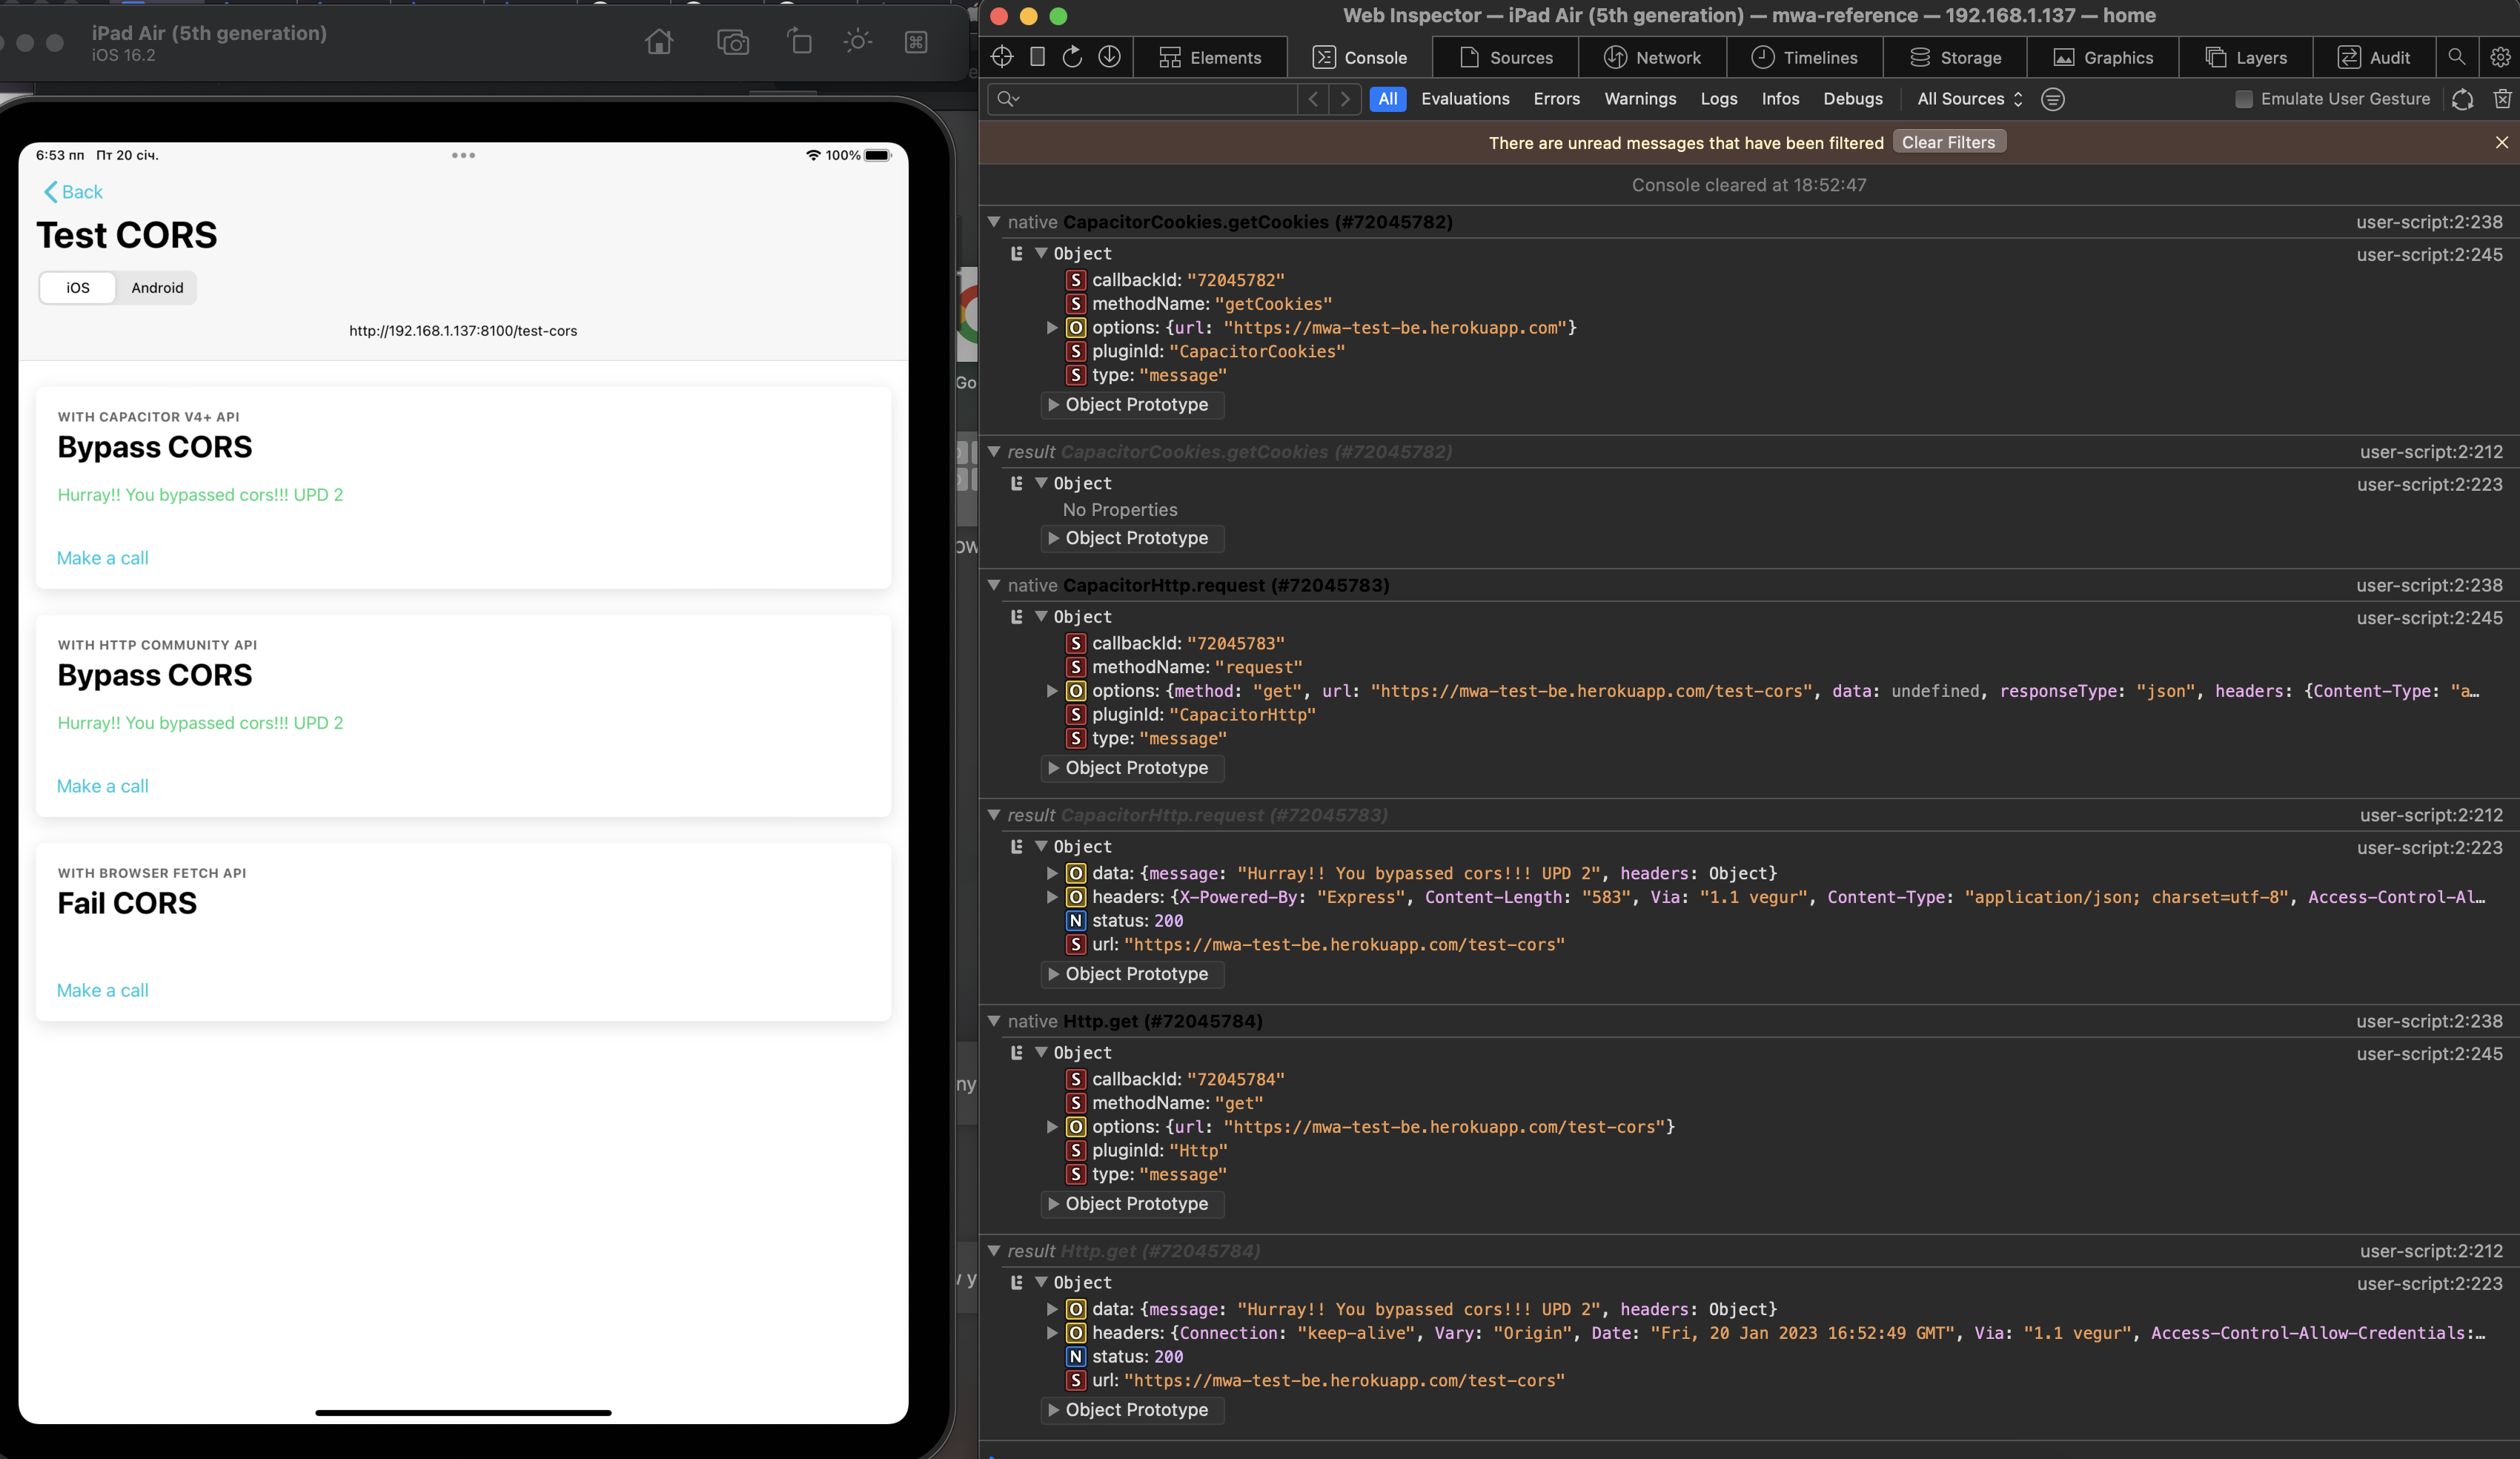
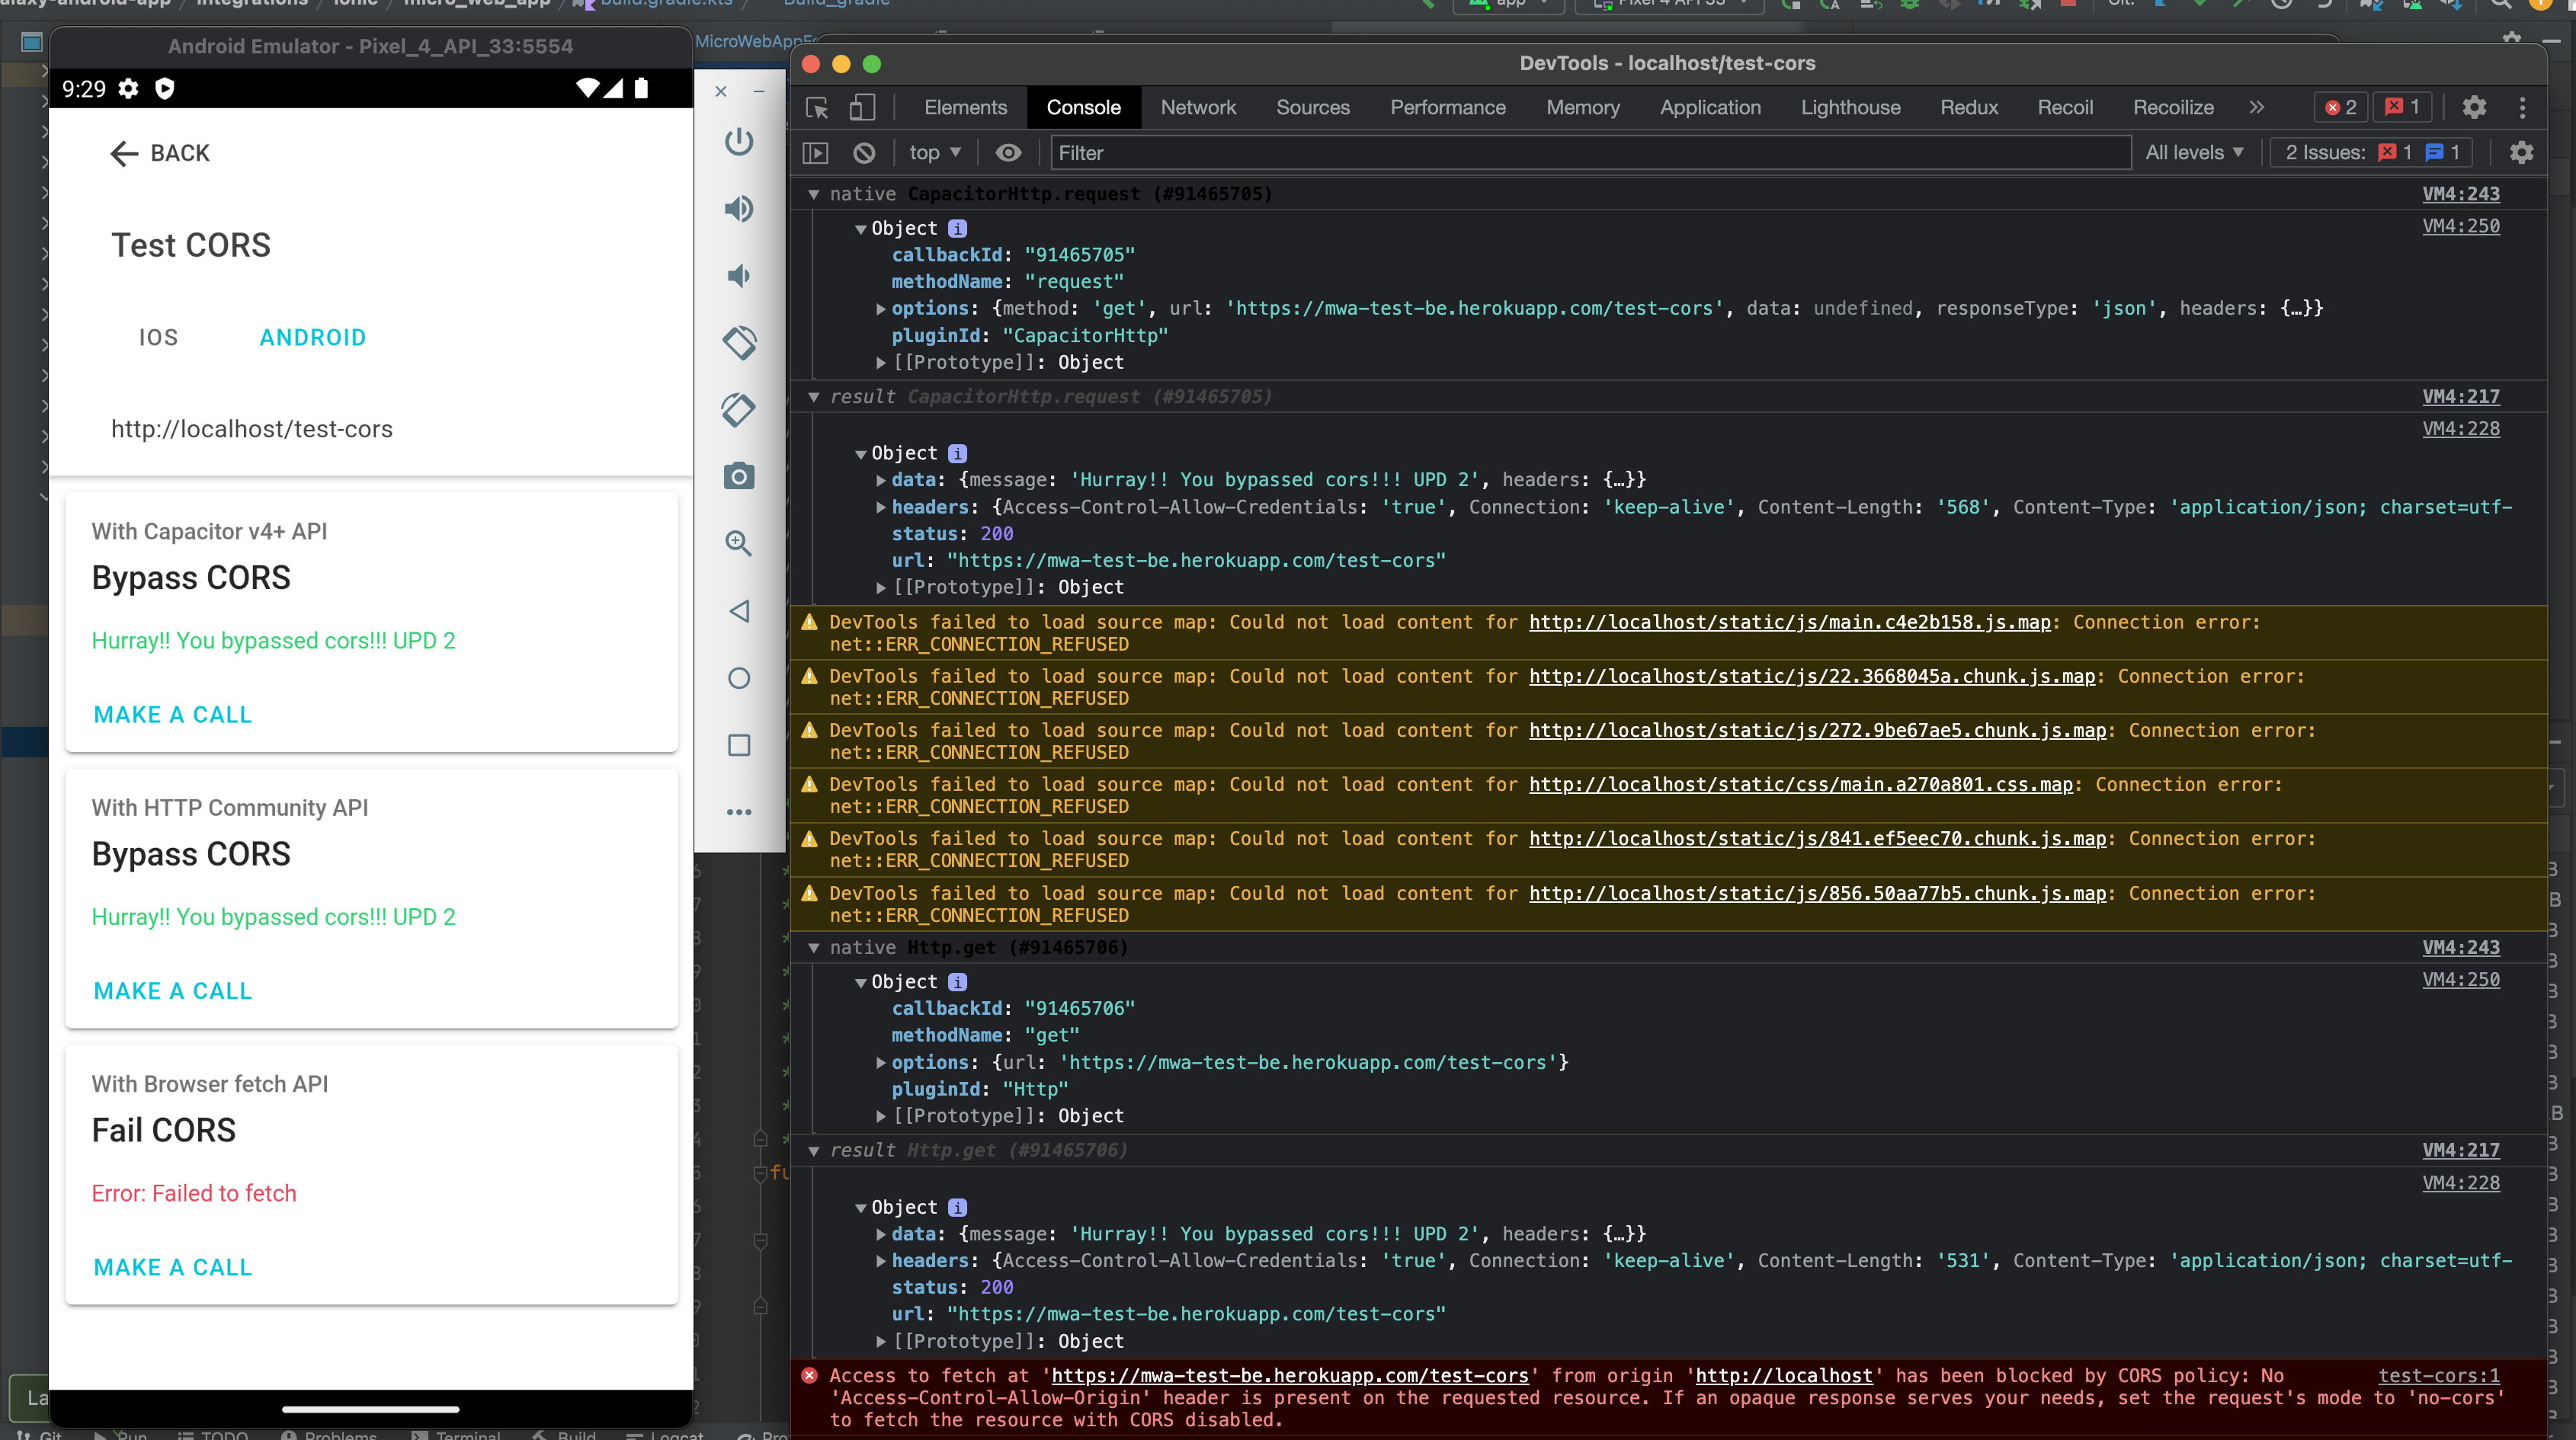
In the MWA it is possible to make HTTP calls with the browser fetch API and it will work well until the backend restricts access to its resources by CORS policies.
By default the MWA runs on http://localhost (Android) or capacitor://localhost (iOS) and usually backends don't allow to make http calls from any origins if it's not specifically configured.
Capacitor allows to change the hostnames with the following capacitor.config.ts config:
"server": {
  "hostname": "my.testbackend.com",
  "androidScheme": "https",
  "iosScheme": "https",
},
This way the MWA can run on different origins. The backend has to also update its CORS config with the corresponding hostname (in this case https://my.testbackend.com). A downside of this approach is that you can't change the CORS configuration of the backend that you can't control.
The most convenient way to bypass CORS is to enable the Capacitor HTTP and Cookies plugins which will allow you to make calls right from the device (not from a browser).
See capacitor.config.ts:
plugins: {
  CapacitorHttp: {
    enabled: true,
  },
  CapacitorCookies: {
    enabled: true,
  },
},
When this is enabled it is possible to use CapacitorHttp and CapacitorCookies from the @capacitor/core package. There you find the unified helper method for making http calls demonstrated in an example of the mentioned plugins usage: createApiRequest.ts (Look for CapacitorHttp.request(...) and CapacitorCookies.getCookies(...))
See the mwa-reference example of how to bypass CORS restrictions and also an example of how to make http requests using CapacitorHttp, react-query and react hooks.
More reading:
- https://ionicframework.com/docs/v5/troubleshooting/cors
- https://capacitorjs.com/docs/apis/http
- https://capacitorjs.com/docs/apis/cookies
In the mwa-reference you find an example of how to receive and store initial context passed from the native app.
See src/index.ts:
const initialContext =
  getInitialContext<PortalsContext>()?.value ||
  ({
    startingRoute: '/home',
    authToken: '',
    language: 'de_DE',
    lightPrimaryColor: '#ebfafc',
    primaryColor: '#00c4dc',
    primaryTextColor: '#ffffff',
    url: 'https://mwa-test-be.herokuapp.com',
  } as PortalsContext);
getInitialContext is the function from @ionic/portals package. When getInitialContext is invoked in the capacitor environment, it returns the initial context that the mobile app provides the web app on launch. When the MWA runs in the browser (e.g. during development), getInitialContext function will not return anything because there is no mobile app that passes initial context into MWA. That's why we have to fallback to the default initial context object.
The initialContext then is passed into <StoreProvider /> which makes the data available globally inside the app.
<StoreProvider
  initialState={{
    portalsContext: initialContext,
  }}
>
  <QueryClientProvider client={queryClient}>
    <App />
  </QueryClientProvider>
</StoreProvider>
In the following you can see how to get portalsContext data in the app inside any component or hook:
const [startingRoute] = useStore(getStartingRouteSelector);See how store and selectors are implemented here - https://github.com/egym/mwa-reference/tree/main/src/store
See an example of how initial context data can be used - useTestAuth.ts
Or see an example of initialContext's authToken usage inside real production MWA application:
const useAuth = () => {
  const [authToken, set] = useStore(getAuthTokenSelector);
  const [backendUrl] = useStore(getUrlSelector);
  const [selectedLocationsIds] = useStore(getSelectedLocationsIds);

  const authQuery = useQuery(
    queryKeys.auth.session(String(authToken)),
    async () => {
      console.log('[WEB] - useAuth - cleanAllCookies');
      await CapacitorCookies.clearAllCookies();
      return authorizeUser({ payload: { egym: { token: authToken } } });
    },
    {
      onSuccess: (result) => {
        const token = result.data.identity?.token;
        const club = result.data.club;
        const user = result.data.user;

        if (token) {
          CapacitorCookies.setCookie({
            key: 'token',
            value: token,
            url: backendUrl,
          });
        }

        if (club) {
          Settings.defaultZone = club.time_zone;
        }

        if (user) {
          // set location ids only during first time fetch, ignore on refresh token
          if (!selectedLocationsIds?.length || !selectedLocationsIds.includes(user.home_location_id)) {
            console.log(
              `[WEB] - set user.home_location_id - ${user.home_location_id}, selectedDate - ${DateTime.now().toISO()}`
            );
            set({ location_id: [user.home_location_id], selectedDate: DateTime.now() });
          }
        }
      },
      enabled: Boolean(authToken),
      retryOnMount: false,
      keepPreviousData: false,
      staleTime: 0,
    }
  );

  return {
    authQuery,
  };
};
More reading:
Thanks to Ionic Portals and Capacitor under the hood we are able to exchange messages with the mobile app.
These are the commands that EGYM Android and iOS team implemented specially for MWA communication. Let's see how to use them:
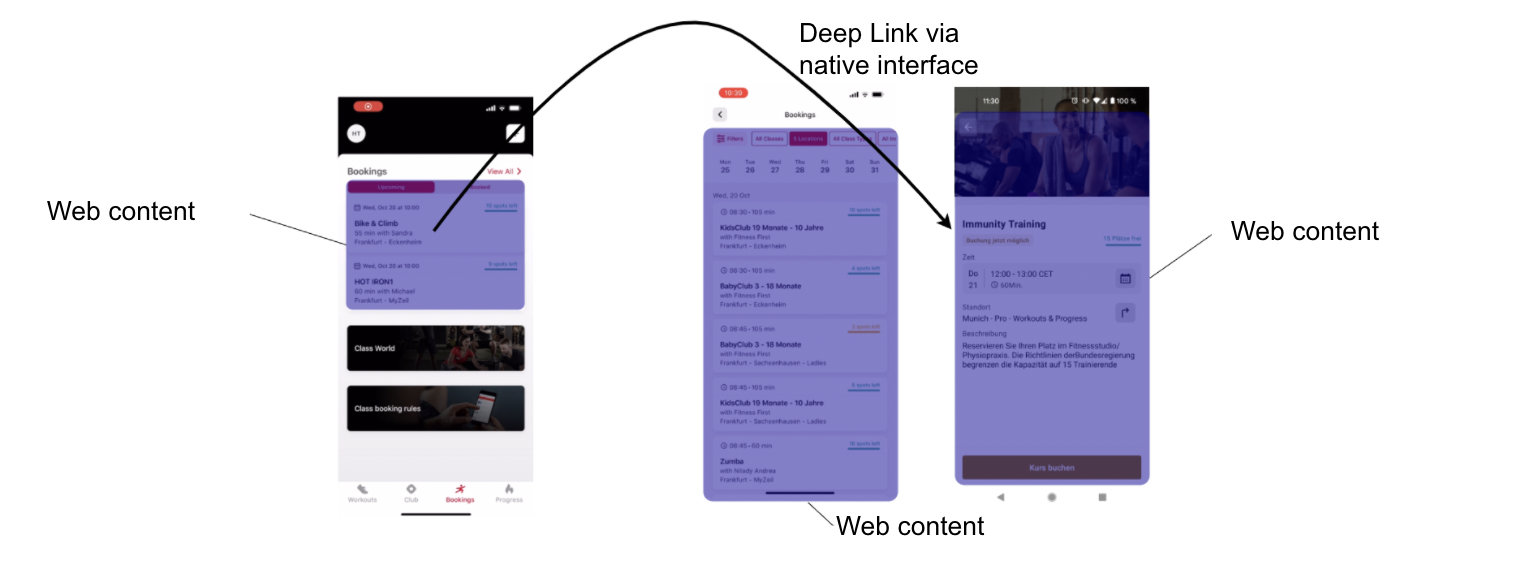
dismiss- Request the native app to close the MWA screen. In the MWA example it is used in the very first root page where MWA opened inside the mobile app. See<CommonPageHeader />component, look forExit MWAbutton and seepublishDismissclick handler which publishessubscriptiontopic withdismisstype. When the mobile app receives this message it closes the current MWA and returns to the page where it was requested to open.authToken- Request the authentication token for the app user. Initially theauthTokenprovided through the initial context on the first app launch. But this token has a ttl and when it expires it is no longer possible to use it, that is why we need a mechanism to get refreshed a token. See queryClient default options. Once BE api returns 401 error, retry function calls the native app withrequestAuthToken()to refetch a new token. When the mobile app receives anauthTokentopic message, it fetches the new token from the EGYM backend and makes anauthTokenpublish request to the MWA with the new token provided. To receive a new message with a new token the MWA subscribes to theauthTokentopic and listens to all messages with that topic from the app. Once it receives a new message it sets a new token to the store, so new data is available globally in the app. See how the pub-sub mechanism is implemented here and here.exerciserInfo- Request exerciser profile data. In order to receive currently logged in user details there is mechanism same as with theauthToken- Request message withexerciserInfotopic. The mobile app then returns the fetched exerciser info back into the MWA, then the MWA should catch it in the subscription. See how the pub-sub mechanism is implemented here and here.openFeature- Navigate to the web app feature by tapping on a widget. See the example of this functionality inside the ClassesWidget. It is needed to jump from one MWA widget that occupies a small part of the UI inside the mobile app into another full page MWA. To support this behavior the MWA should implementstartingRouteproperty handling from initialContext. See the src/Layout.tsx component and howstartingRouteprop is used to route redirect:
<Route path="/" render={() => <Redirect to={startingRoute || '/home'} />} exact={true} />The image below demonstrates the openFeature use case. On the image at the left there is a classe widget rendered as MWA, a click on a particular class item navigates to full page MWA. Using regular react router navigation will not work here, because of the MWA only a small peace of UI is allocated on the native view and opening the page that is intended to be used as a full screen page will be rendered in the same limited view, that's why the openFeature command is needed.
Mobile team has implemented the read-only error topic, meaning MWA can't push messages to this topic but only subsribe to it and receive possible errors from native app. The error can occur for example when the MWA sends a new authToken command, then the native app receives it but when fetching new token from the backend it receives 500 or any other error - in this case instead of sending error back to the MWA in the authToken topic, the native app uses error topic and sends error in a generic format as described here - type attribute will identify the failed command, optional code, url and message fields will be populated depending on a command and provide details of failed request.
See an example of how error subcription implemented in the reference MWA in the usePortalsSubscriptions hook:
await Portals.subscribe<string>({ topic: 'error' }, ({ topic, data }) => {
  console.log('[WEB] - subscription - error', topic, data);

  const error = parseJson(data) as PortalsError;

  presentAlert({
    header: t('errors.oops'),
    subHeader: error.type,
    message: error.code || error.message || error.url ? `${error.code} ${error.message} ${error.url}` : undefined,
    buttons: [{ text: 'Refresh', handler: () => window.location.reload() }],
    backdropDismiss: false,
    translucent: true,
    animated: true,
  });
});
Here it only shows an error alert with Refresh app button. But handling of the error can vary in different MWAs and in different cases depending on the error type, for example, you can redirect back to another page, or exit the MWA, or present the user some fancy error page, etc.
Notice all pages in the mwa-reference app have the same structure:
<IonPage>
  <IonHeader> // optional
    // Page header title, back btn or smth. See <CommonPageHeader /> component
  </IonHeader>
  <IonContent> // always required
    // Your content of the page/widget. May consist of ionic's framework components, or your own.
  </IonContent>
  <IonFooter> // optional
    // Content that should always be stick to the bottom, e.g. "Book class" button on the ClassDetails.tsx page
  </IonFooter>
</IonPage>
Following this structure ensures that the MWA app will display all elements inside the mobile app correctly. Using IonHeader and IonFooter with the IonToolbar applies a proper safe area indent on the top and at the bottom of the mobile app screen (if MWA is opened in full screen mode).
More reading:
- https://ionicframework.com/docs/layout/structure
Capacitor provides the web app with additional css variables :
--ion-safe-area-top
--ion-safe-area-right
--ion-safe-area-bottom
--ion-safe-area-left
Using these variables proper indents are set out of the box. They are also available in the custom SCSS code for the cases when, for example, you don't have an IonFooter on the page, but still want to set a proper indent to the bottom of the page, so the content is always properly visible and e.g. the iOS home button does not overlap.
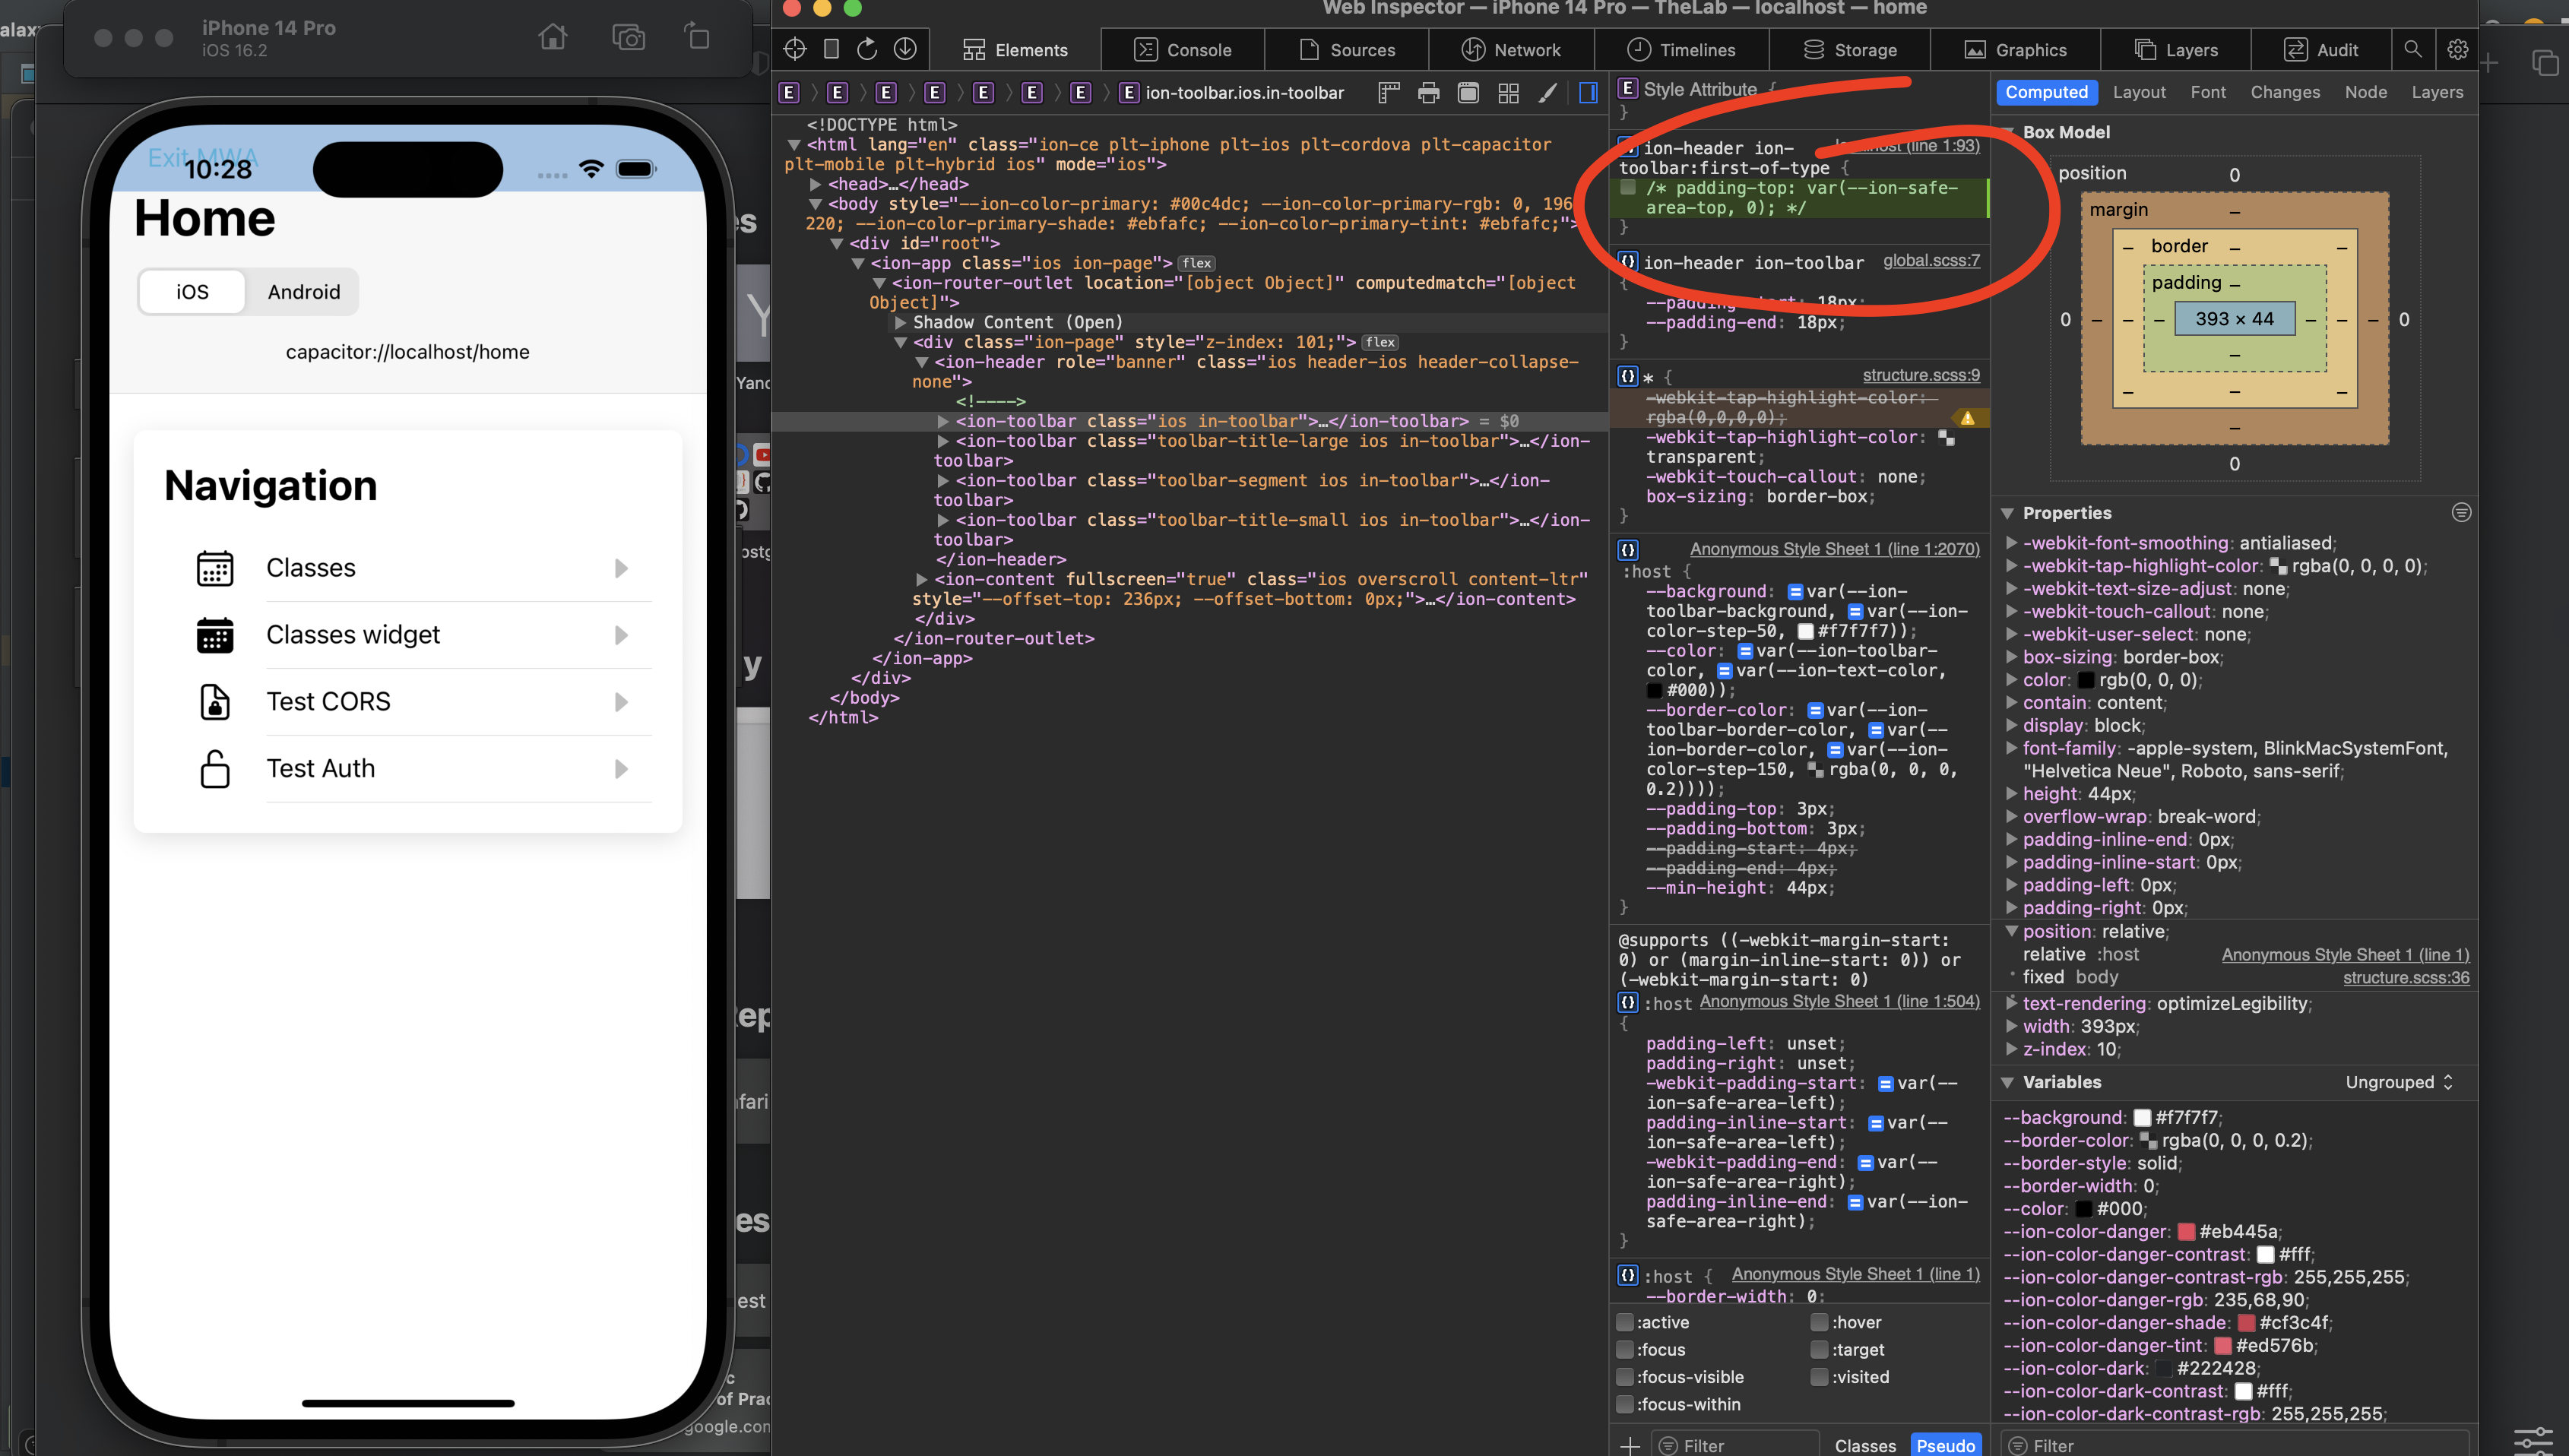
See the example below: The green area on the top is a padding-top set on the IonToolbar component:
padding-top: var(--ion-safe-area-top, 0)The padding is applied automatically, because the app is running inside the Capacitor environment:
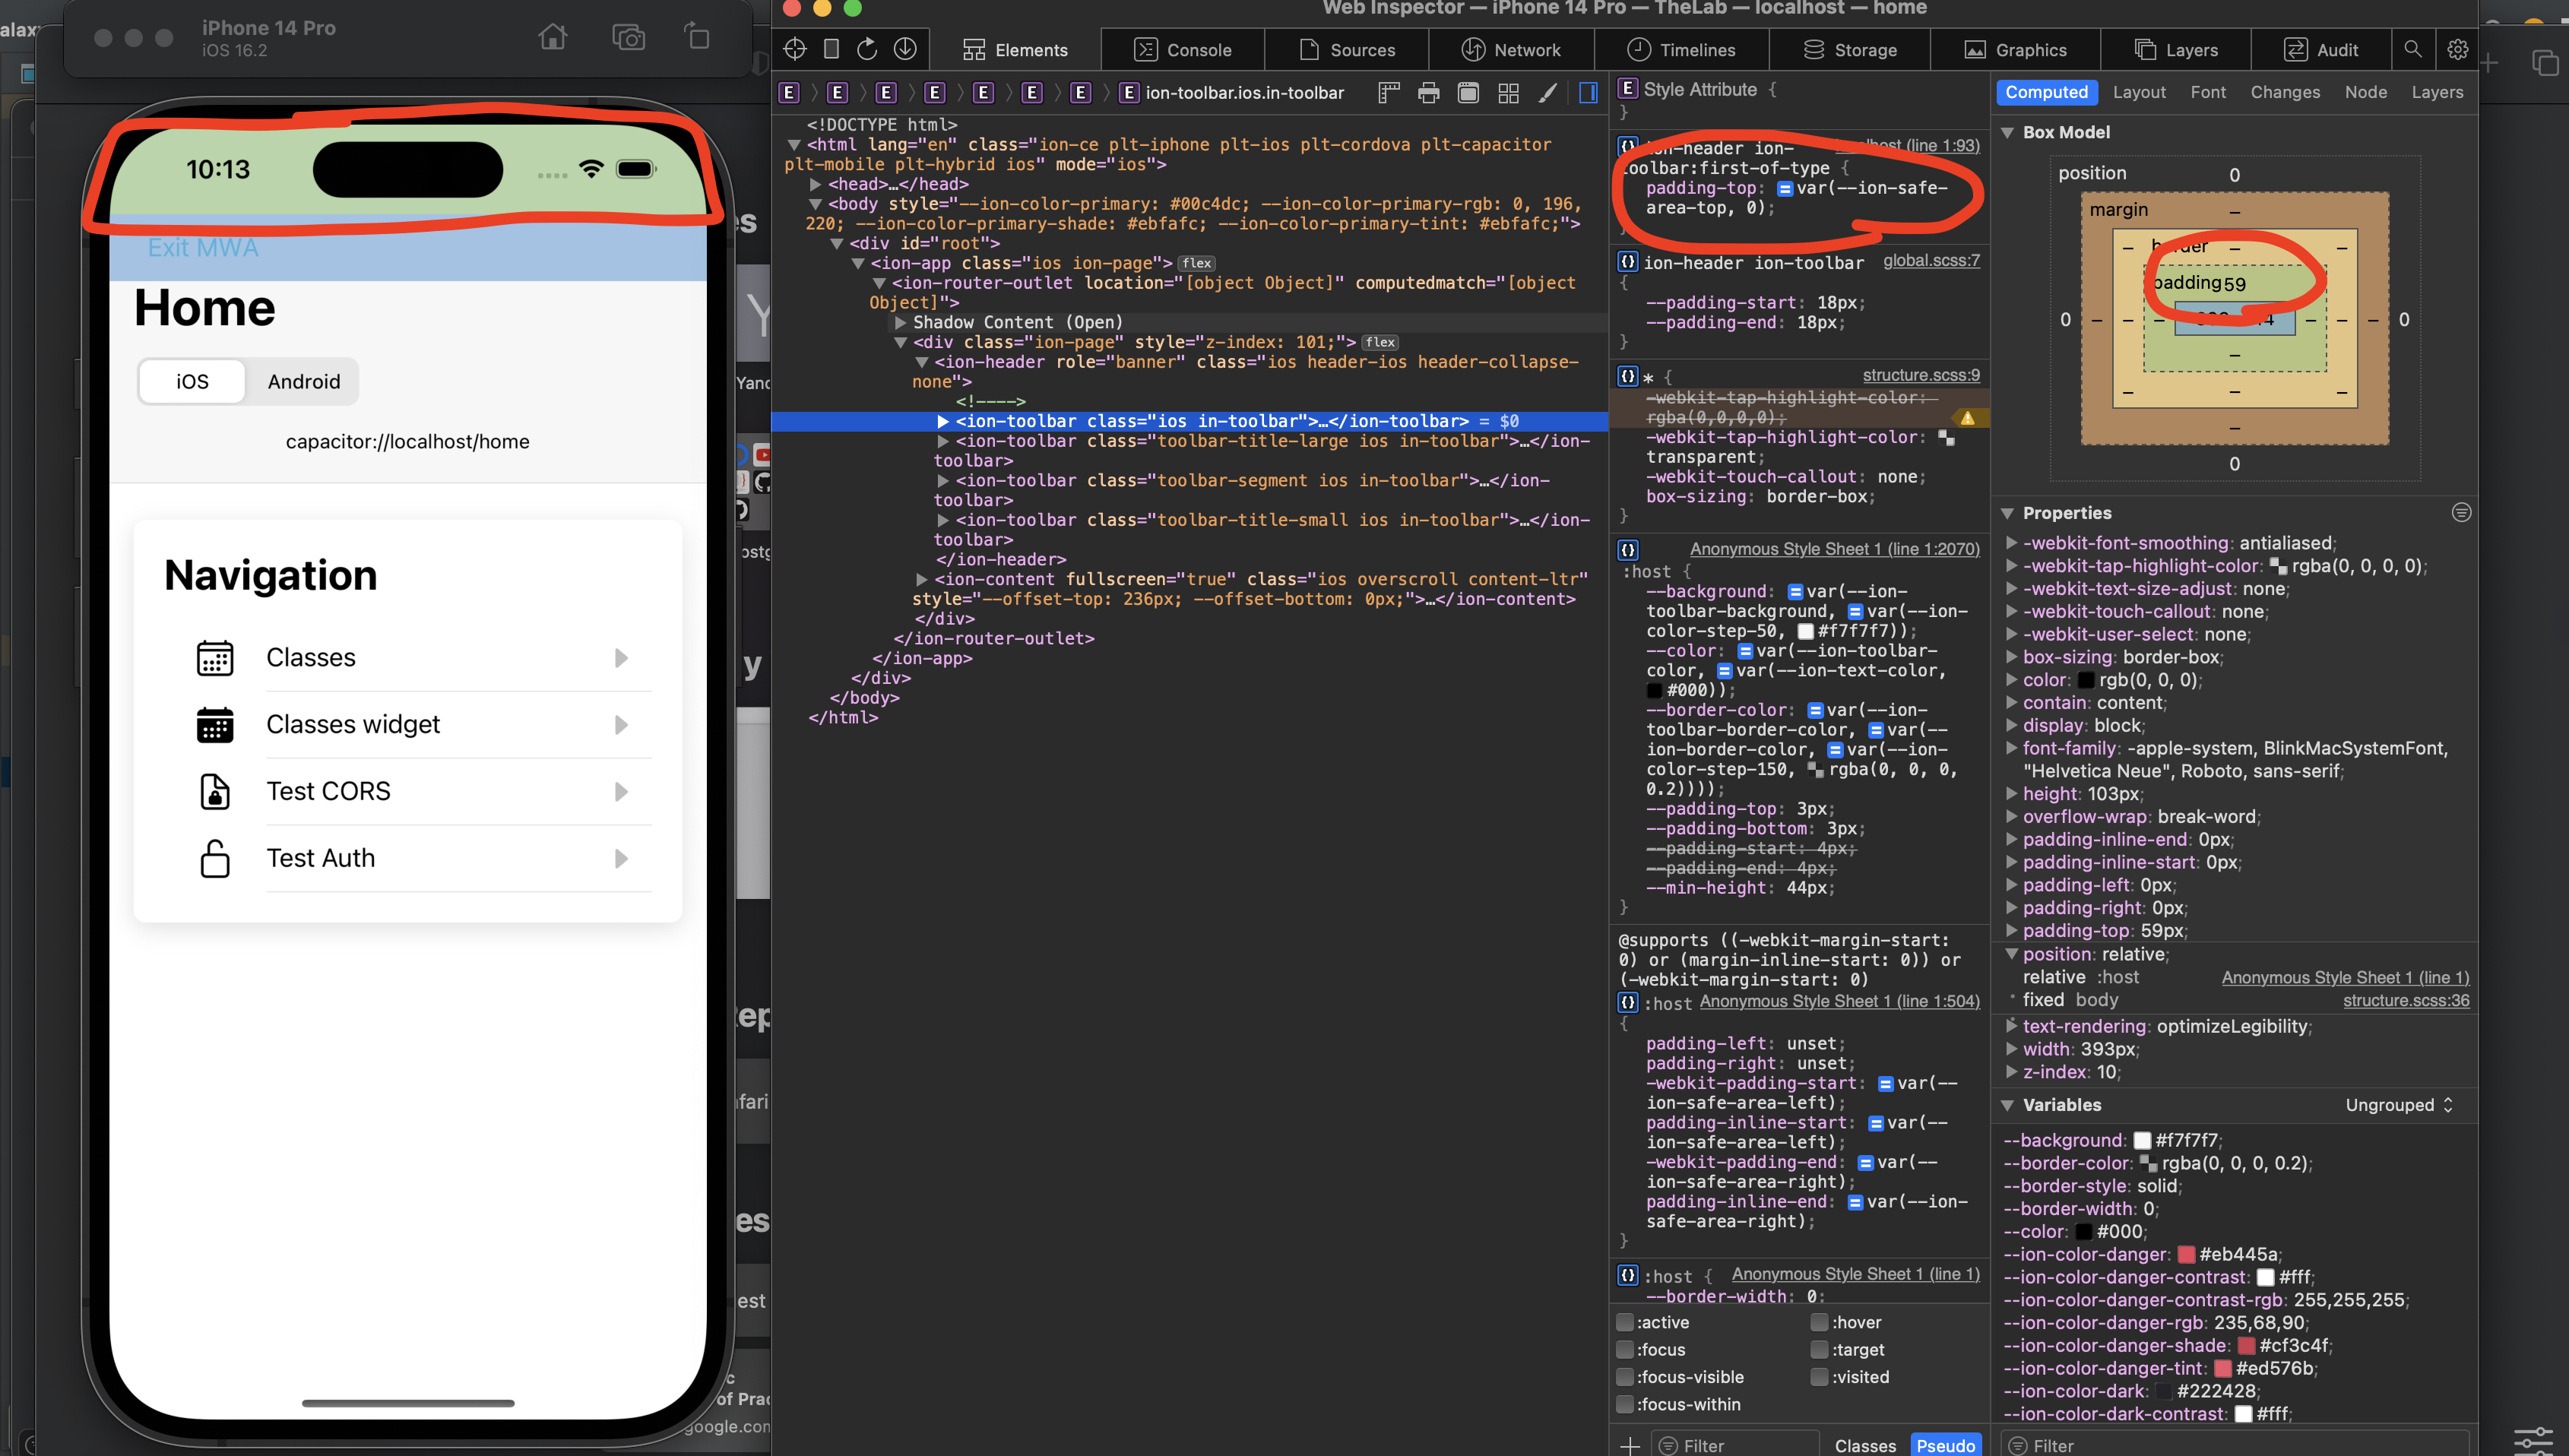
If we disable this padding-top property for demonstration then the Exit MWA button will be shifted up and will stay under the iOS system time display:
More reading:
- https://ionicframework.com/docs/theming/advanced#application-variables
The native app passes a language property to the MWA on app launch. The MWA has to use it to fetch the fitting locales files and apply correct date formatting.
See src/i18n.ts implementation of the i18next for strings translations. Attention there is a custom language detector:
languageDetector.addDetector({
  name: 'portalsInitialContext',

  lookup() {
    return window.portalsContext?.language || 'en-US';
  },
});
We recommend using the Luxon library for working with dates and times in JS. It provides an easy way for date manipulation and formatting for different locales. It is also important to handle the difference in date & time formatting for different countries, e.g. 5/11/09 (May 11, 2009) (American) vs 11/5/09 (11 May 2009) (British). Luxon takes care of this and makes formatting very easy.
See how the Initial Context's language property is used to set which language to use on formatting:
initialContext.language = initialContext.language.replace('_', '-');
Settings.defaultLocale = initialContext.language;To make the MWA reuse the same color scheme and look as similar as possible to the native, the mobile app passes the following color props inside initial context. Each brand has its own color values.
lightPrimaryColor: '#ebfafc',
primaryColor: '#00c4dc',
primaryTextColor: '#ffffff',
In order to apply it, the MWA should set the received colors props to the predefined ionic's css variables - src/index.ts (setThemeColors(window.portalsContext))
export const setThemeColors = (context: PortalsContext) => {
  const primaryColor = new Color(context.primaryColor);
  const textColor = new Color(context.primaryTextColor);

  document.body.style.setProperty('--ion-color-primary', primaryColor.hex);
  document.body.style.setProperty('--ion-color-primary-rgb', primaryColor.rgbString);
  document.body.style.setProperty('--ion-color-primary-contrast', textColor.hex);
  document.body.style.setProperty('--ion-color-primary-contrast-rgb', textColor.rgbString);
  document.body.style.setProperty('--ion-color-primary-shade', primaryColor.shade(0.12).hex);
  document.body.style.setProperty('--ion-color-primary-tint', context.lightPrimaryColor);
};
Or you can set it to any other custom css variable and reuse it when applying styles to custom components and overriding ionic's components props.
The EGYM BMA app currently supports only light mode so you don't need to care about adopting colors for dark mode.
Ionic provides variables that exist at the component level, such as --background and --color. For a list of the custom properties that a component accepts, view the CSS Custom Properties section of its API reference. For example, see the Button CSS Custom Properties.
More reading:
- https://ionicframework.com/docs/theming/basics
- https://ionicframework.com/docs/theming/themes
- https://ionicframework.com/docs/theming/css-variables#ionic-variables
We should ensure that the MWA app behavior is as snappy as possible by minimizing the number of loading screens. Every http response should be cached so when an end user enters the page they have already visited, for the second time they will not see the loading screen again.
EGYM recommends using the react-query library which makes it easy to cache and invalidate or replace cache data. See examples of how it could be used:
To easily manage query cache keys, there is the queryKeys factory. You can reuse it for the cases when you need to revalidate or remove stored cache by a specific key.
There are also some alternatives to react-query, such as swr or rtk-query. You can see a comparison here https://react-query-v3.tanstack.com/comparison.
This is how we recommend to approach the MWA development
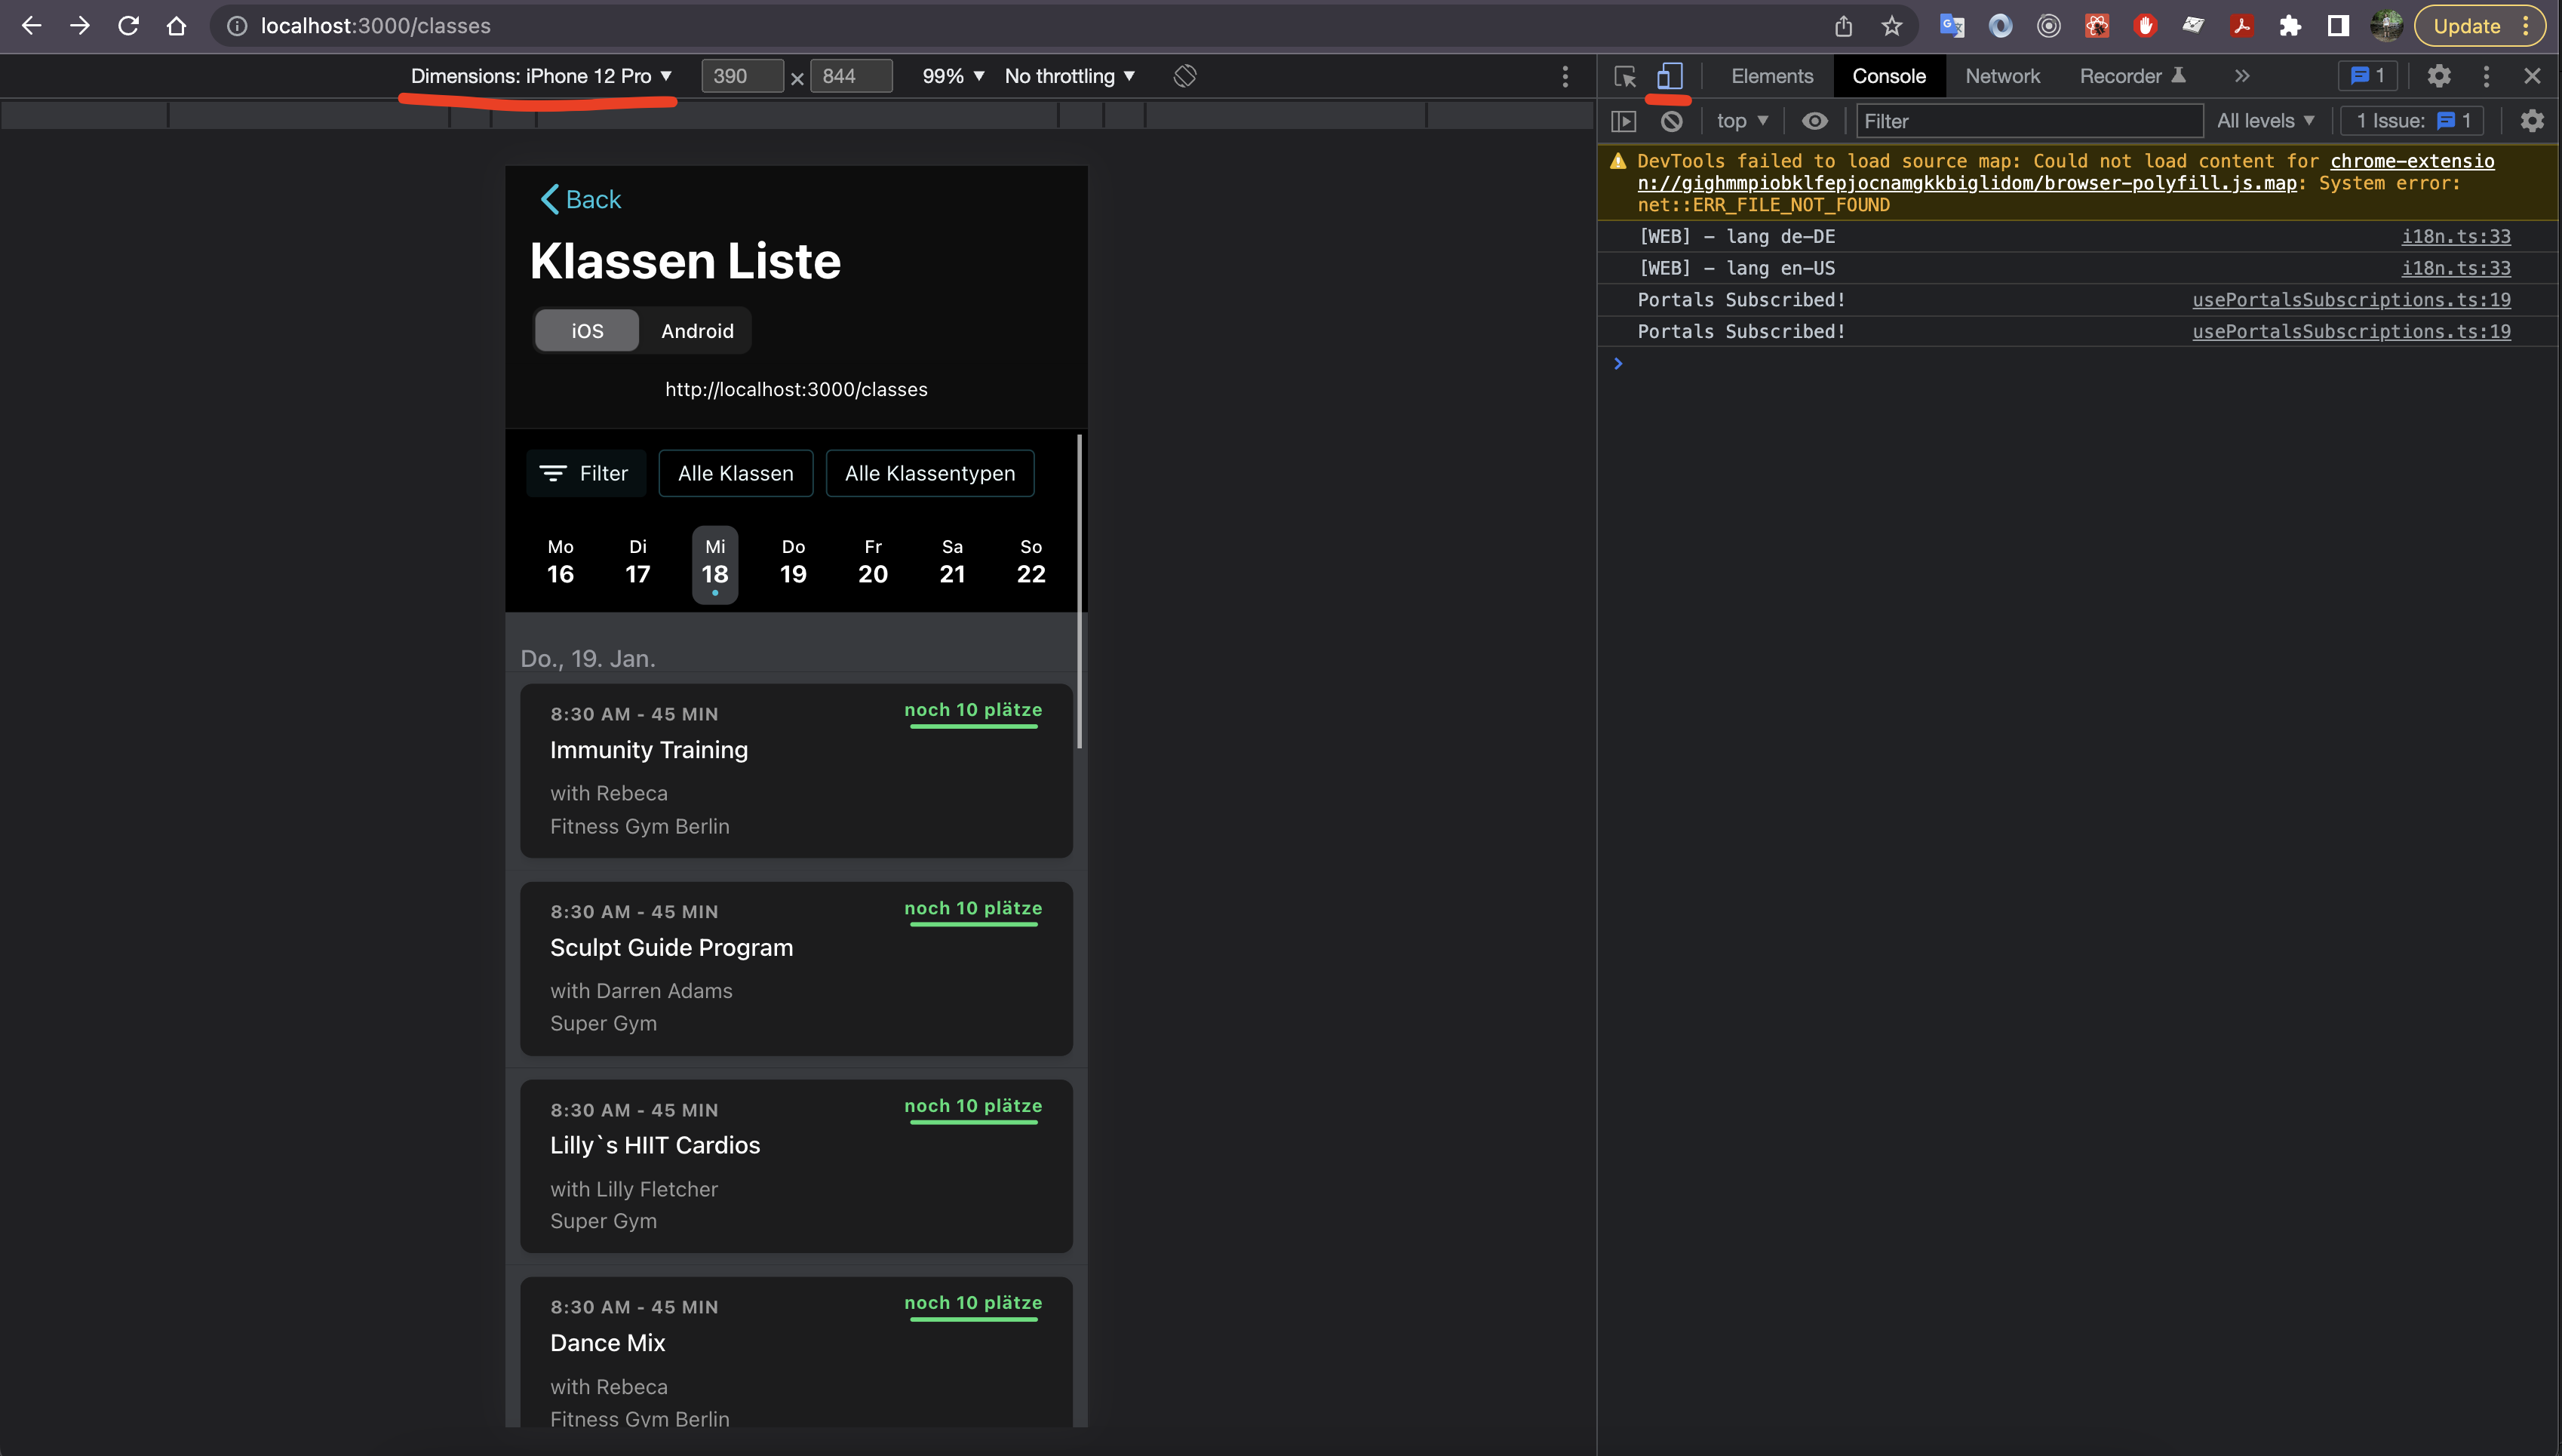
As long as you don't need to perform any mobile app related checks you can run your app simply with npm start, it will be opened in a browser. Then you have to toggle the device toolbar and select the needed device in the Dimensions dropdown. This is the easiest way on how to develop an MWA without native specifications.
If you need to check any native app stuff, like safe-area or HTTP CORS or Cookies handling, etc, without the EGYM BMA app context (excluding commands), you can run iOS or Android simulator locally with help of Ionic CLI.
Run the following:
ionic cap add iosYou will see the new ios folder added in the root of the project.
If you are running Mac with M1 Chip you may get ruby error which relates to Cocoapods. Try Removing Cocoapods and then installing it from Homebrew.
Once ionic cap add ios invoked successfully, run next:
npm run build && ionic cap sync
ionic cap run ios -l --external
Wait till capacitor will create and run xcode build and open a simulator:
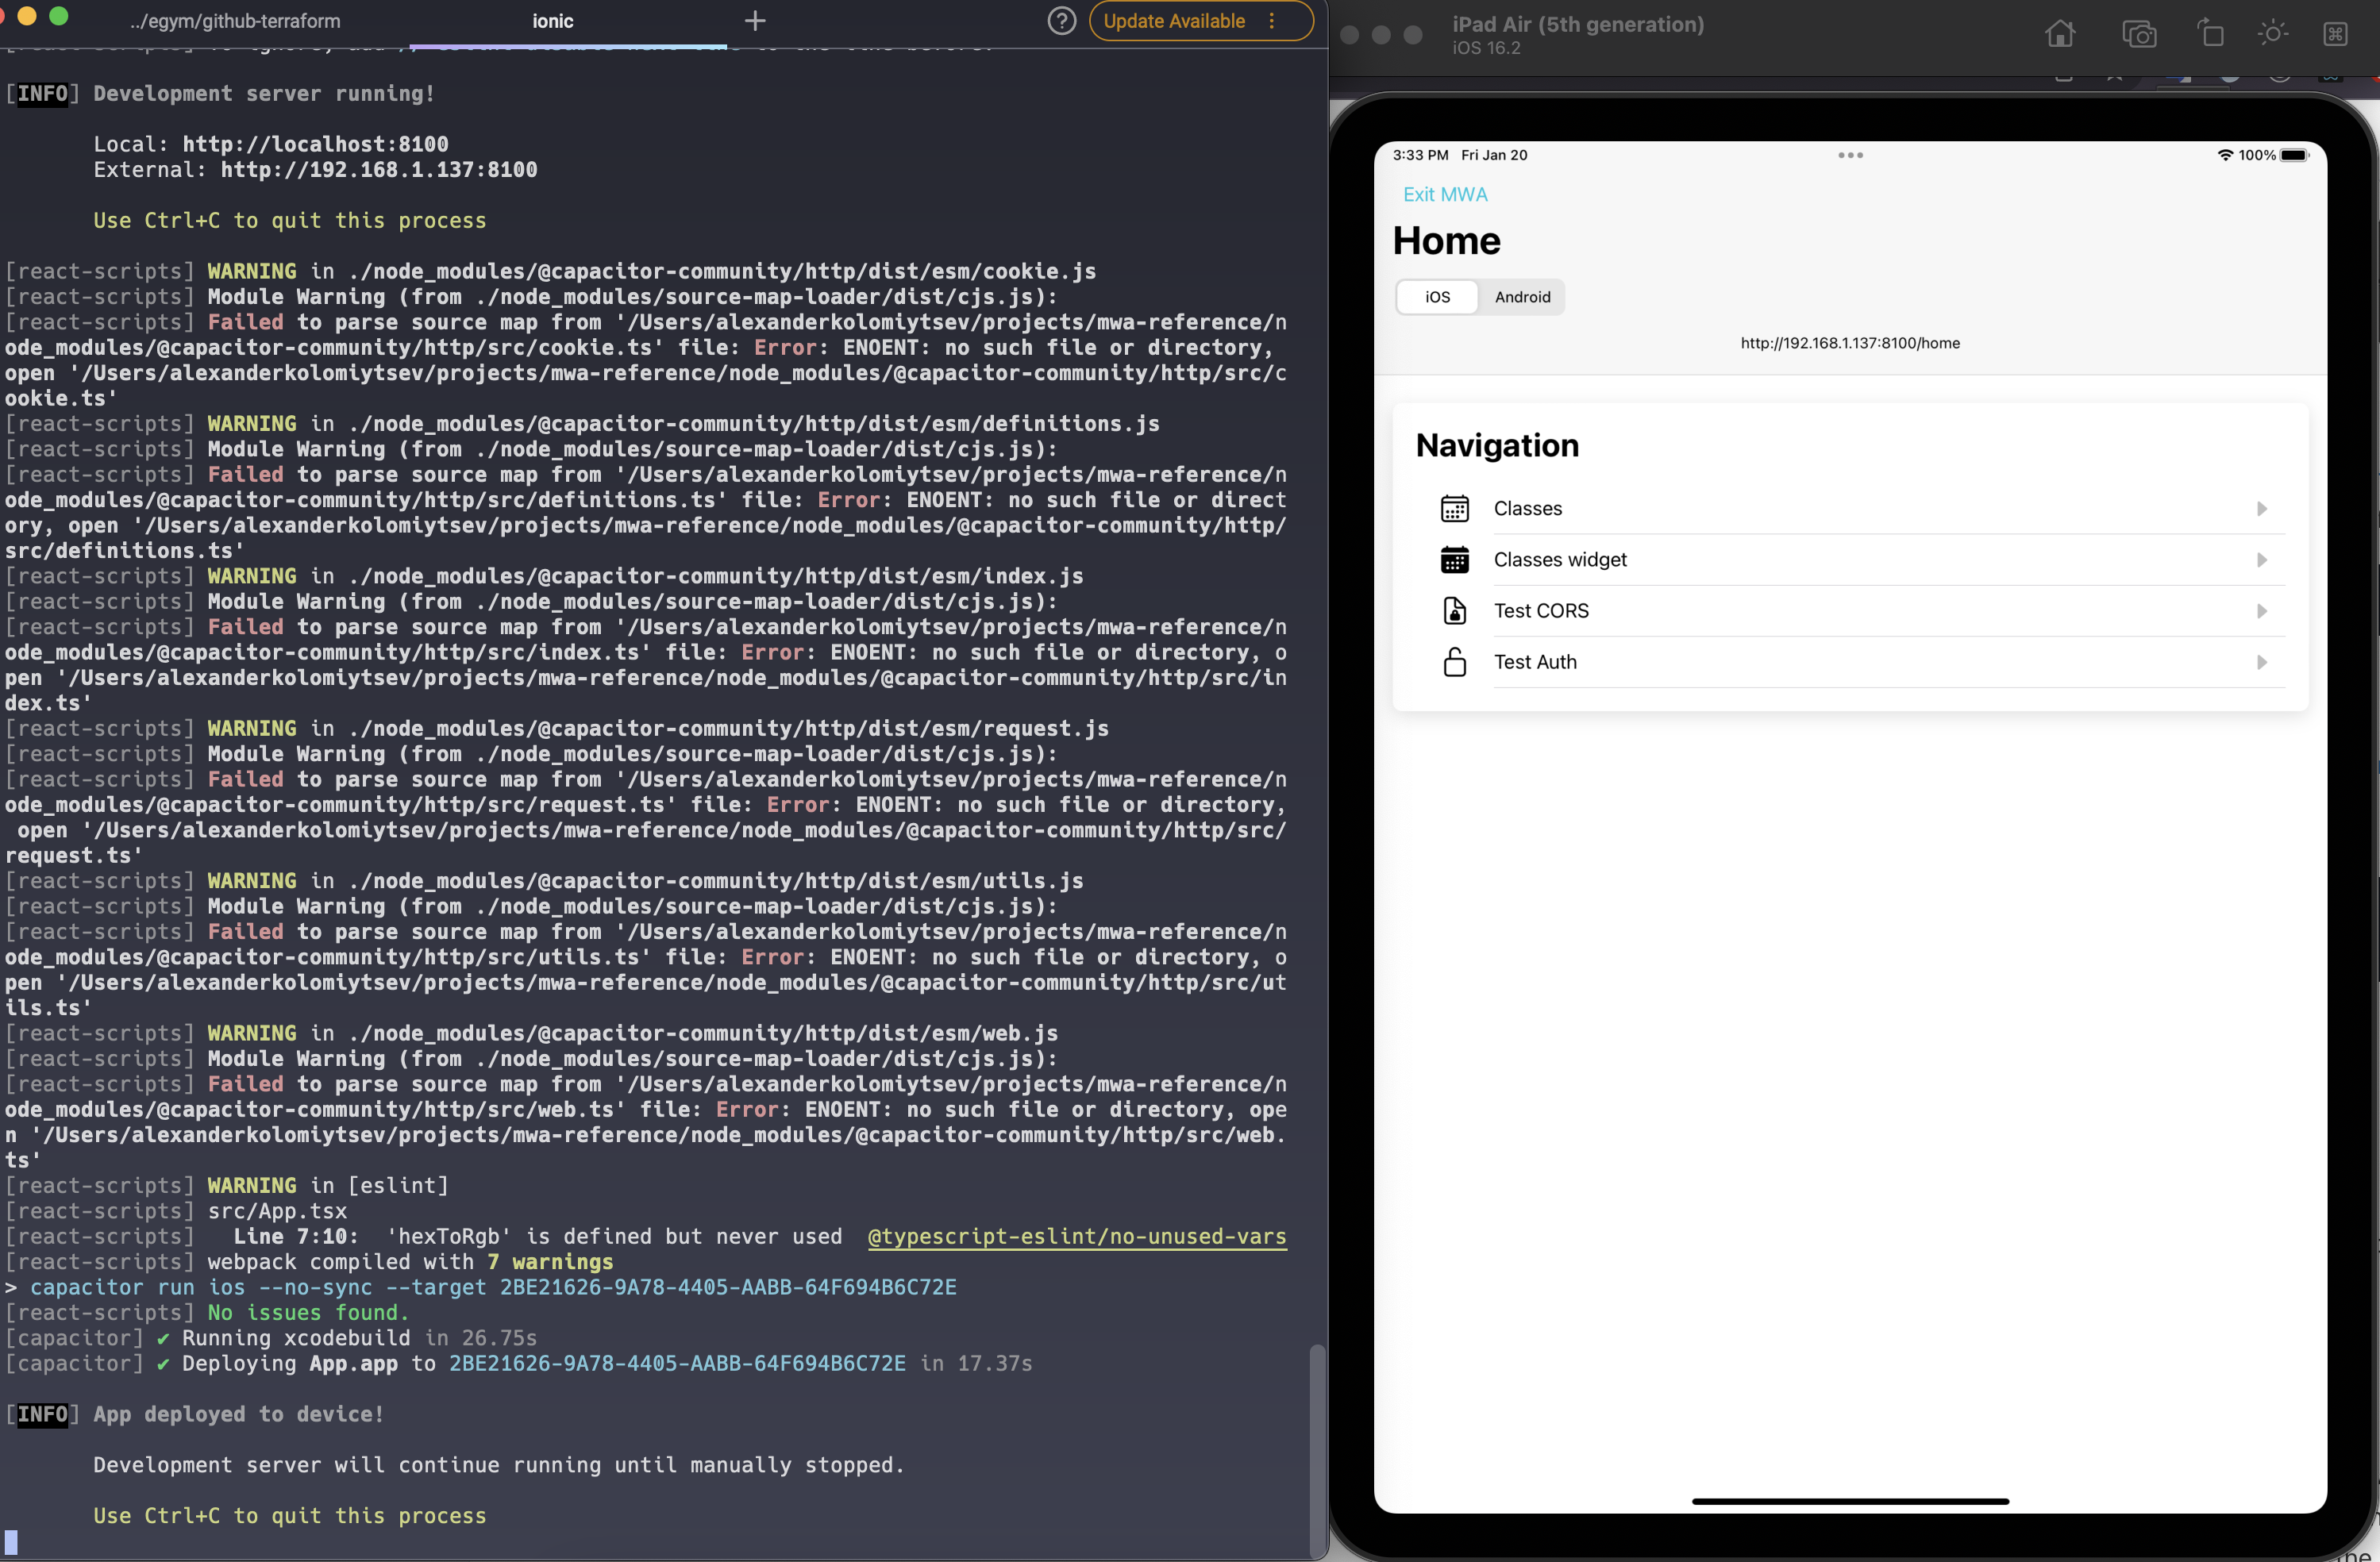
You can do the same with android, just replace ios with android in commands above.
See the guide on how to debug and see logs from the webview opened inside simulator see these sections:
More reading:
- https://ionicframework.com/docs/troubleshooting/debugging
Otherwise, if you need to check the full integration with the EGYM BMA app including commands and receiving a real initial context, then you need to ask the EGYM team for creating you configured iOS or Android build. Then you can run it either on your computer in a simulator or install it on your phone.
Native builds will be connected to the specified MWA from the Appflow dashboard, so you can autonomously make changes in the MWA, commit & push changes, make web builds and deploy them to the specified channel. Afterwards Ionic Portals Live update will push the new build right onto the device and display the changes.
Download Android studio, add virtual device and run a simulator.
Get Android build (.apk file) from the EGYM team and install it on the simulator.
Follow Debug MWA inside Android build section to debug MWA inside provided build.
More reading:
- https://ionicframework.com/docs/troubleshooting/debugging
Debugging iOS builds has some limitations:
- Debugging iOS webviews requires Safari, so your dev computer must be running macOS.
- You can only debug webviews in applications loaded onto your device through Xcode. You can't debug webviews in apps installed through the App Store or Apple Configurator.
So the only way to debug iOS builds provided by the EGYM team is to install it to any Apple device (either MacOS or iOS) and debug changes by pushing new commits and making new builds in Appflow dashboard.
You can use browser alert functions to log needed info. Logs will be rendered right on the screen. Since alert only accepts strings, to display object information you can use the following:
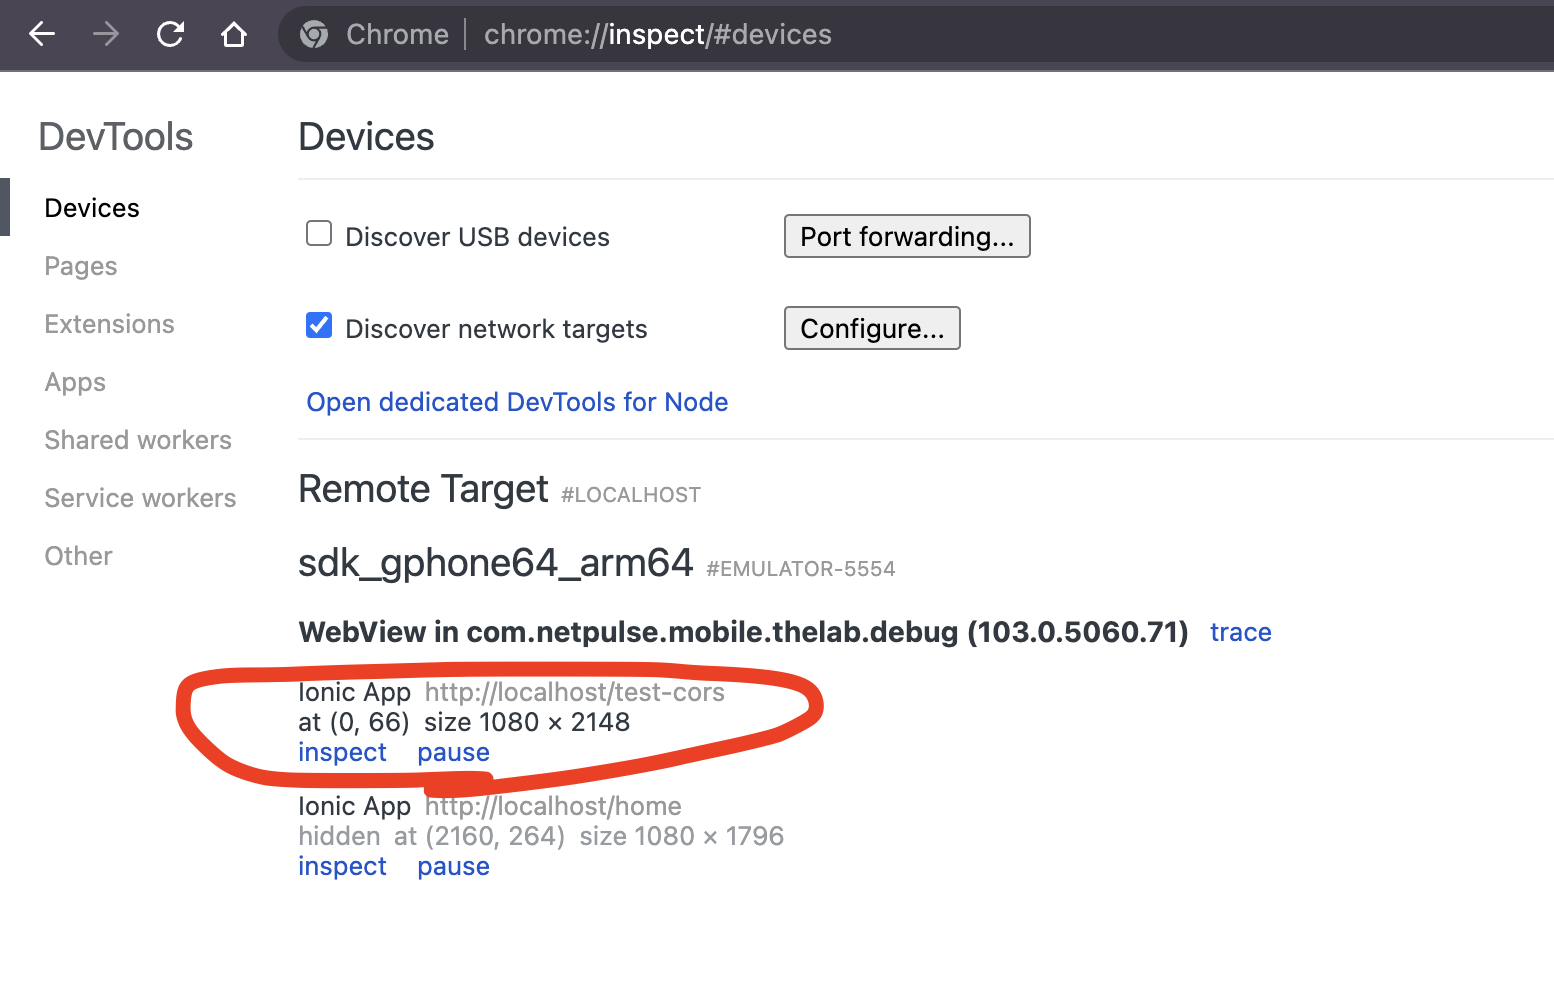
alert(JSON.stringify(someData, null, 2))Once you have Android app with MWA opened inside simulator up and running on your computer, you can easily debug your MWA with chrome devtools. To do so open Google Chrome browser and enter chrome://inspect url. You will see the list of webviews opened inside the Android app simulator. Click "inspect" under the one that is not "hidden at" and use opened Chrome Dev Tools window to inspect the logs and see native Portals and Capacitor requests.
| 1 | 2 |
|---|---|
 |  |
If you have running iOS build that is generated from Xcode on your computer (Capacitor app with Ionic CLI case) you can use Safari Web Inspector to see all logs and http requests.
Enable developer tools in Safari on your dev computer. Launch Safari on your dev machine and navigate to
Safari > Settingsin the menu bar. In the preferences pane that appears, click on theAdvancedtab and then enable theShow Develop menu in menu baroption at the bottom.Open Xcode build
In Safari on your dev computer, click on
Developin the menu bar and hover over the dropdown option that is your iOS device's name to show a list of MWA instances running on your Xcode build.Click the dropdown option for the webview that you wish to debug. This will open a new Safari Web Inspector window.